Implementing ReAct Agentic Pattern From Scratch
AI Agents Crash Course—Part 10 (with implementation).
Introduction
Building advanced AI agents has been greatly simplified by high-level frameworks like LangChain and CrewAI.
However, these frameworks often hide the underlying logic that makes an AI agent tick.
More specifically, under the hood, many such frameworks use the ReAct (Reasoning and Acting) pattern to let large language models (LLMs) think through problems and use tools to act on the world.
For example, an agent in CrewAI typically alternates between reasoning about a task and acting (using a tool) to gather information or execute steps, following the ReAct paradigm.
This approach enhances an LLM agent’s ability to handle complex tasks and decisions by combining chain-of-thought reasoning with external tool use.
While frameworks like CrewAI implement this logic for you and you should also keep using them in production systems (also because they are built by experts), often times, relying on pre-packaged libraries without understanding their inner workings can lead to confusion.
You might use an agent framework and wonder how it decides to, say, perform a web search or a calculation as part of answering a question.
An example is shown below where the Agent is going through a series of thought activities before producing a response.
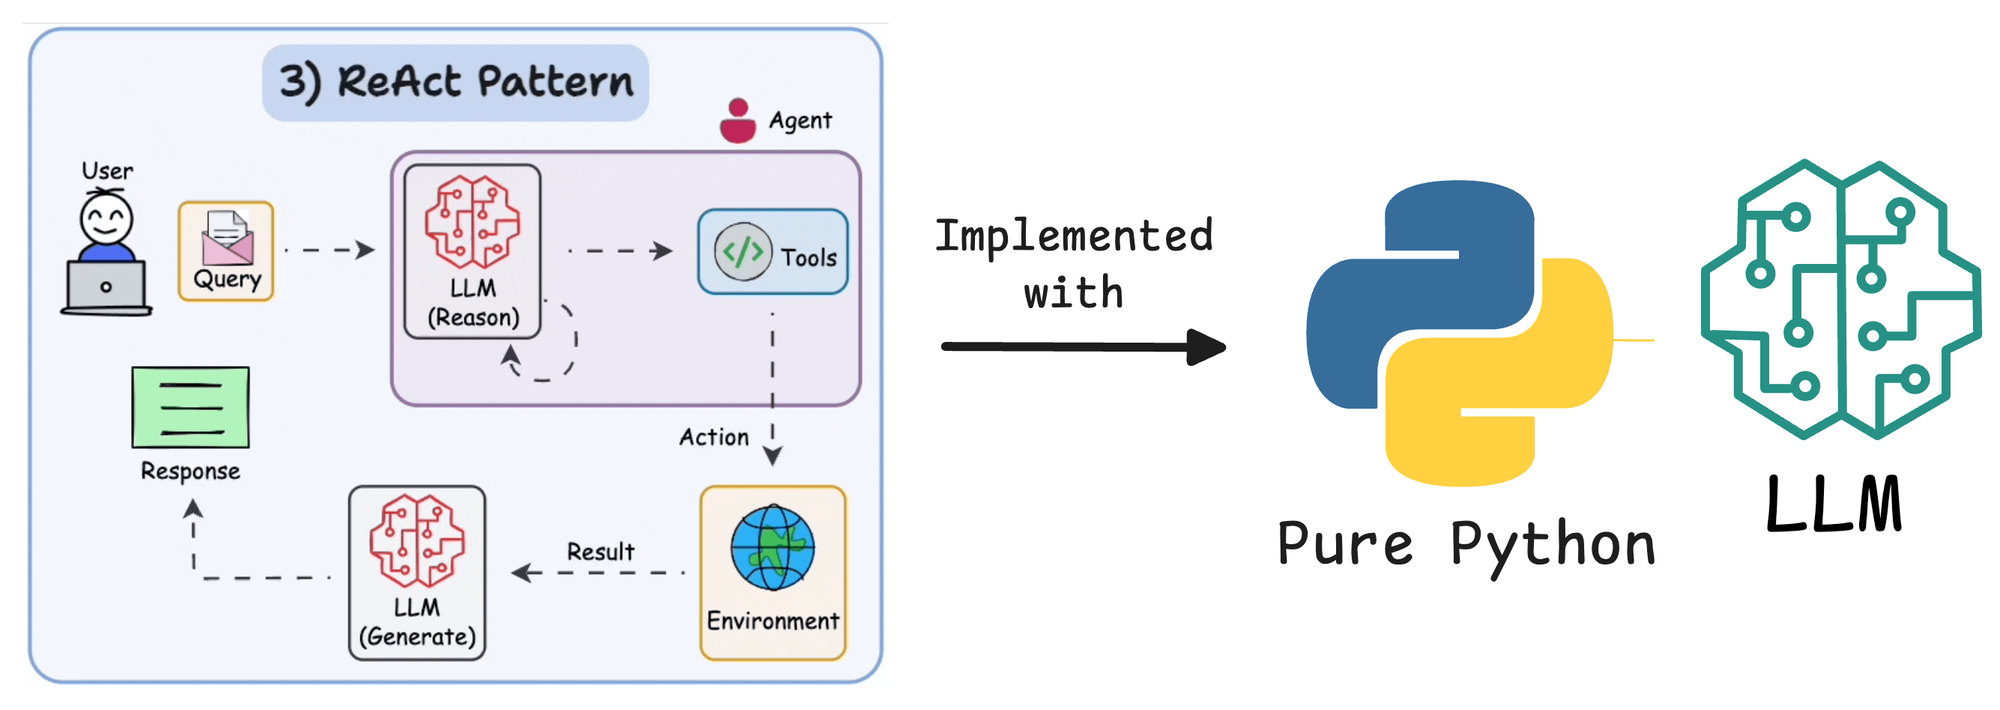
In this article, we’ll demystify that process by building a ReAct agent from scratch using only Python and an LLM.
By doing so, we gain full control over the agent’s behavior, making it easier to optimize and troubleshoot.
We’ll use OpenAI, but if you prefer to do it with Ollama locally, an open-source tool for running LLMs locally, with a model like Llama3 to power the agent, you can do that as well.
Along the way, we’ll explain the ReAct pattern, design an agent loop that interleaves reasoning and tool usage, and implement multiple tools that the agent can call.
The goal is to help you understand both the theory and implementation of ReAct agents.
By the end, you’ll have a working agent and a clear picture of how frameworks like CrewAI leverage ReAct internally.
Let's begin!
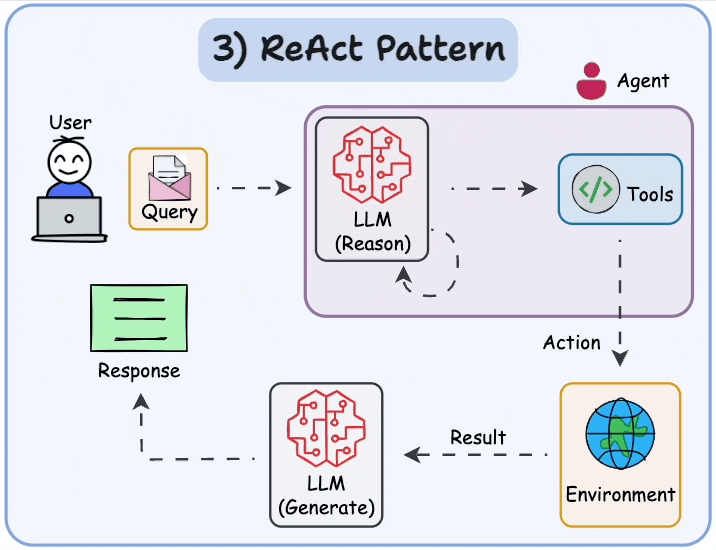
What is ReAct pattern?
ReAct (short for Reasoning and Acting) is a paradigm for AI agent design where an agent uses chain-of-thought reasoning and tool-using actions in aggregation.
Instead of generating a direct answer in one step, a ReAct agent thinks step-by-step and can perform intermediate actions (like looking something up or calculating a value) before finalizing its answer.

To get a clear perspective on this, Like think about how ReAct pattern works.
Sample 1
Formally, an LLM following ReAct generates reasoning traces (the “Thoughts”) and task-specific actions (calls to tools) in an interleaved manner. This means the model’s output might look something like:
- Thought: I should calculate the total.
- Action:
Calculator("123 + 456") - Observation:
579 - Thought: Now I have the sum; next, I need to multiply it.
- Action:
Calculator("579 * 789") - Observation:
456,831. - Thought: I have the final result.
- Final Answer:
456,831.
The reasoning traces (the chain of thoughts) help the model plan and keep track of what to do next, while the actions let it consult external sources or perform calculations to gather information it otherwise wouldn’t have inherent access to.
In effect, the model isn’t limited to its internal knowledge; it can reach out to tools, databases, or the internet as needed and then reason about the results.
This significantly enhances what the agent can do.
IBM describes ReAct agents as ones that use an LLM “brain” to coordinate reasoning and action, enabling interactions with the environment in a structured but adaptable way.
Unlike a basic chatbot that answers with whatever is in its static knowledge, a ReAct agent can think, search, calculate, and then combine the results into an answer.
Sample 2
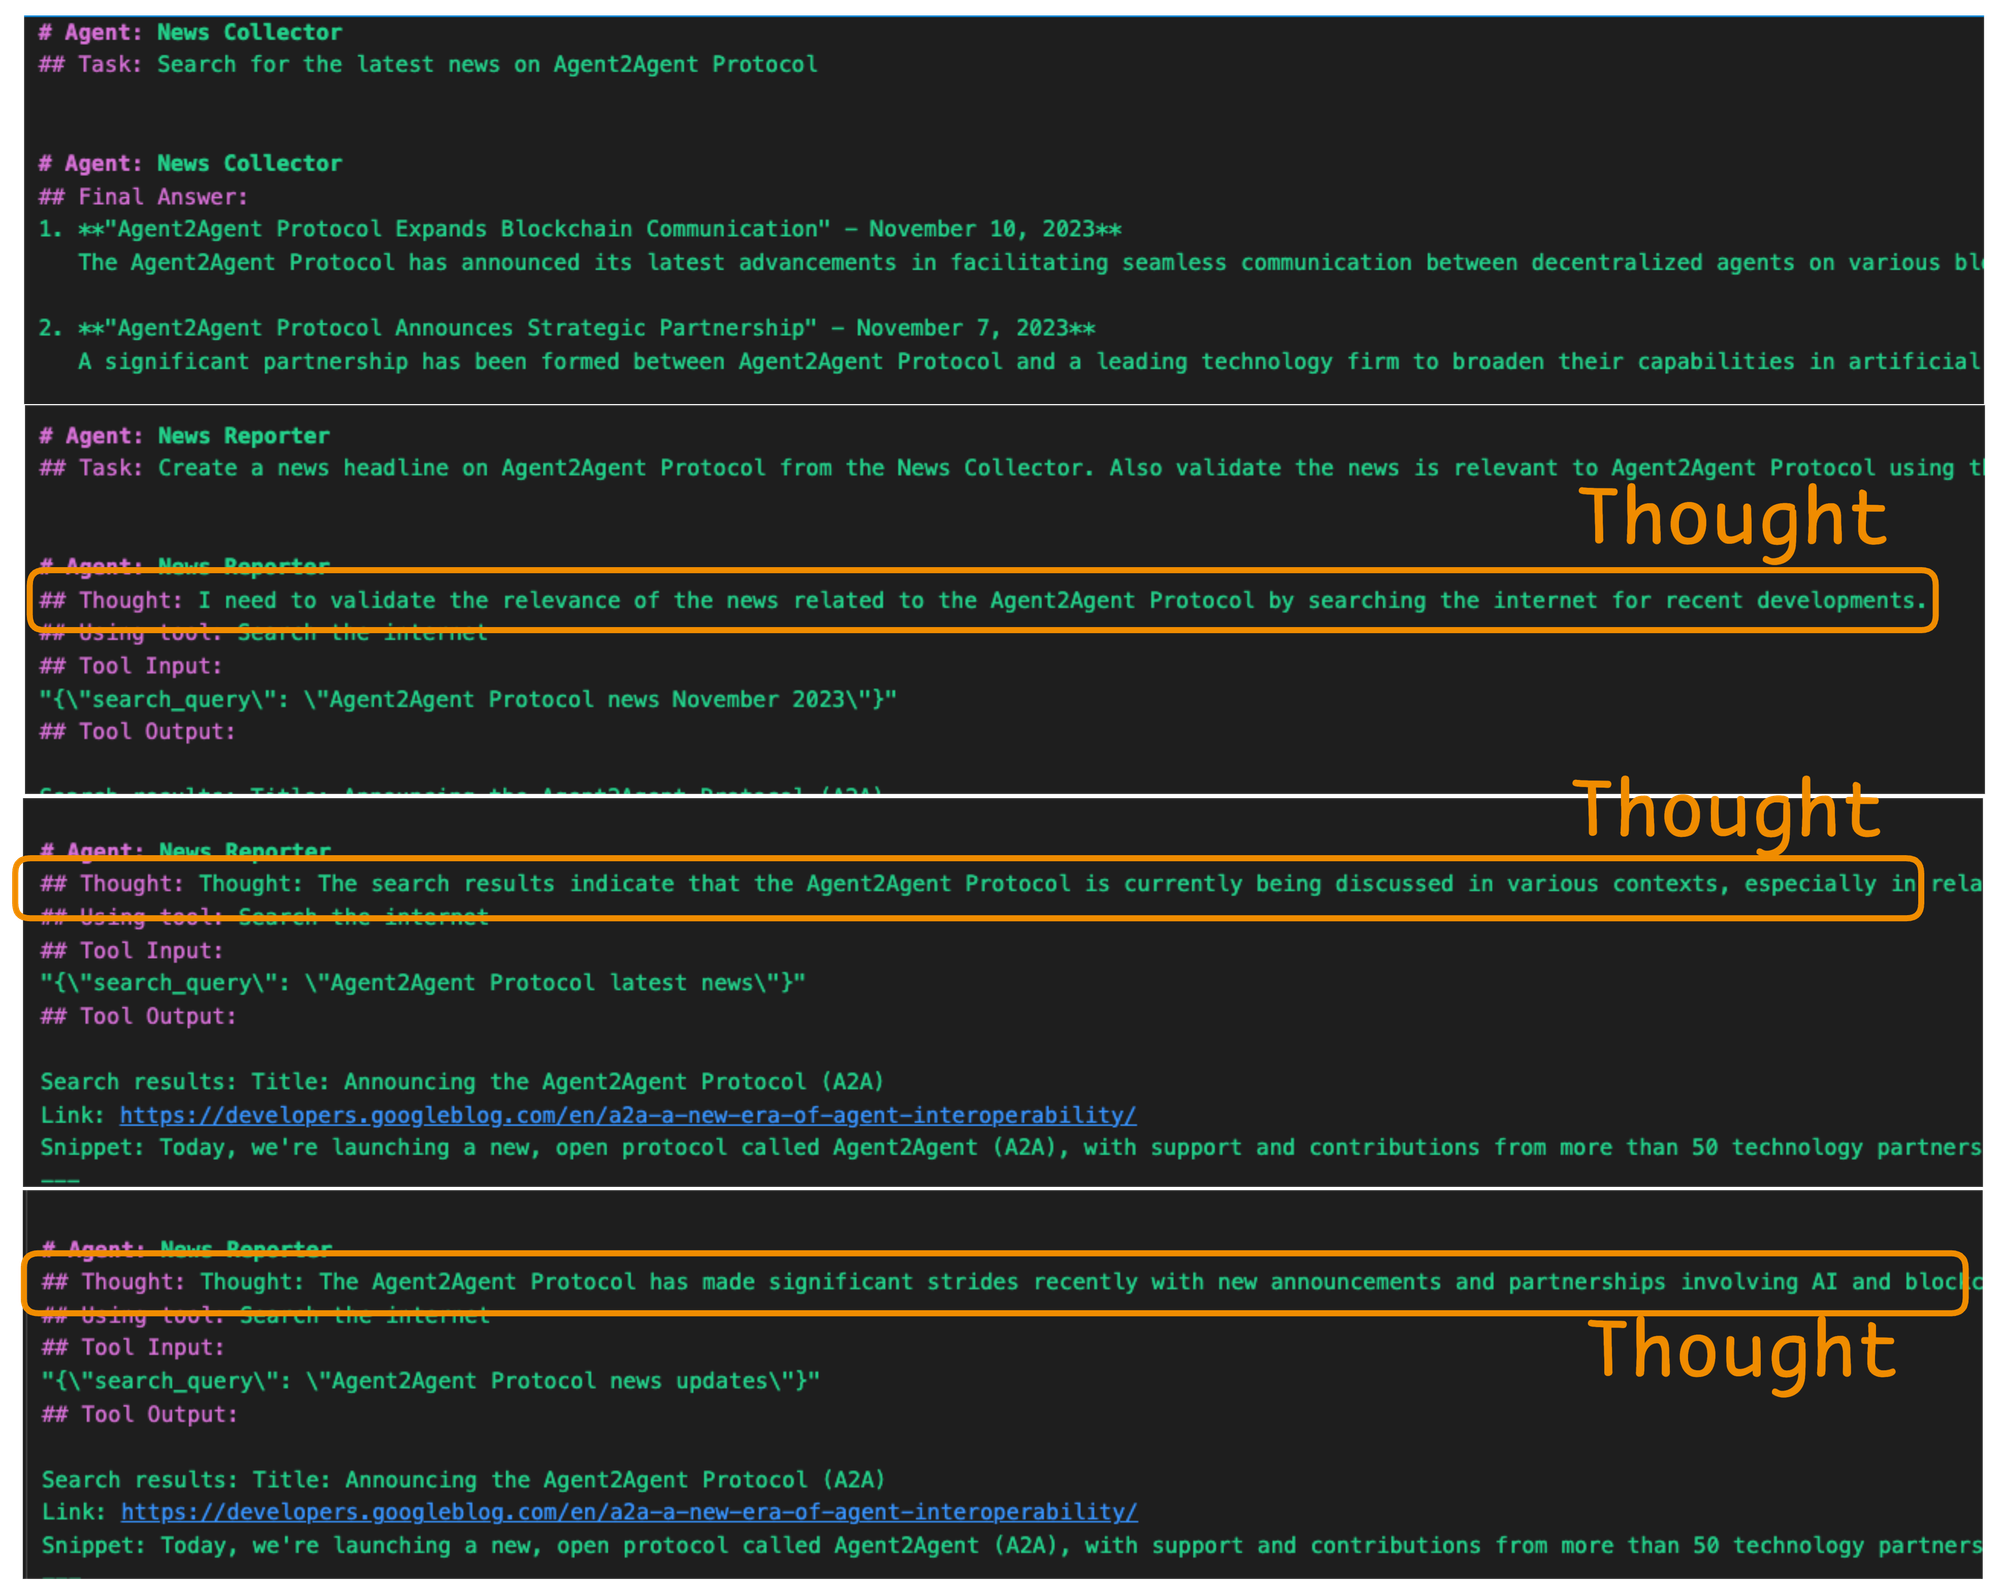
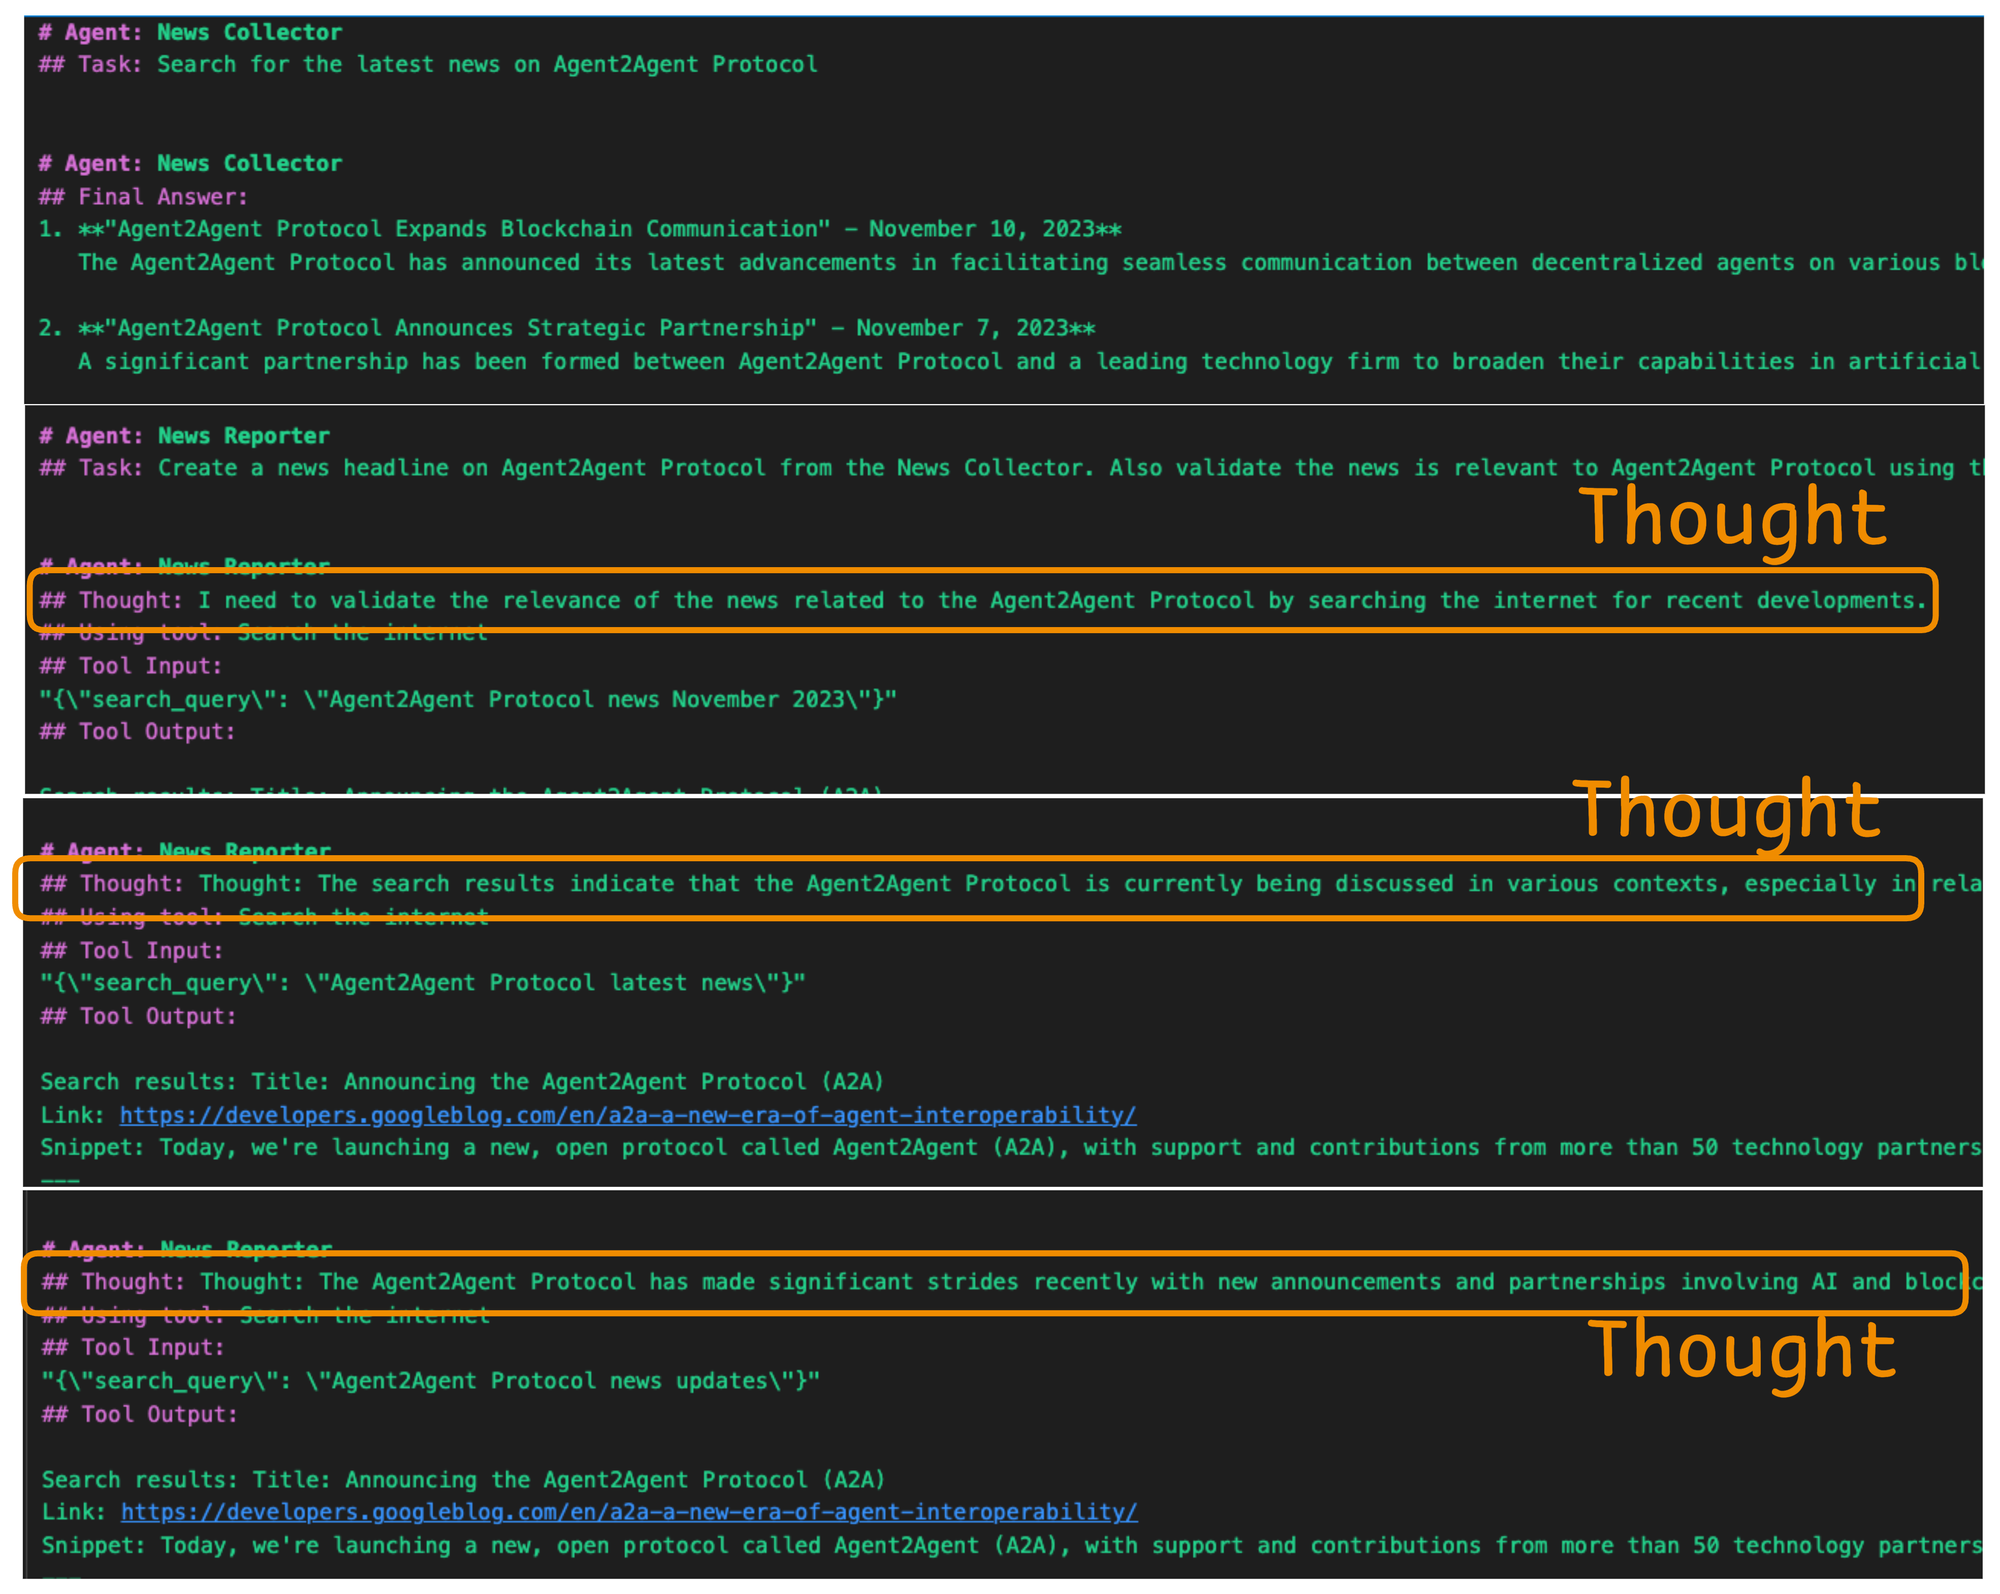
Consider the output of an Agent I built in a multi-agent system (we'll get to the code shortly):

In the example shown above, we see a live trace of an AI News Reporter Agent executing a task using the ReAct paradigm. The agent has been asked to create a news headline related to the "Agent2Agent Protocol". However, rather than jumping to conclusions, it reasons step by step, as seen in its structured trace.
Let’s break this down:
- Agent Role:
News Reporter– This agent specializes in curating and validating news content. - Task: The agent has been instructed to generate a news headline and ensure it's relevant to the Agent2Agent Protocol.
- Thought: The agent first reasons internally that it should validate the information by performing a quick search for any recent updates about the protocol. This is the reasoning part of the ReAct cycle.
- Action: It proceeds to use a tool labeled
Search the internet, passing in a structured JSON input with the query:"Agent2Agent Protocol news November 2023". This is the acting step where the agent leverages external tools to gather real-world data.
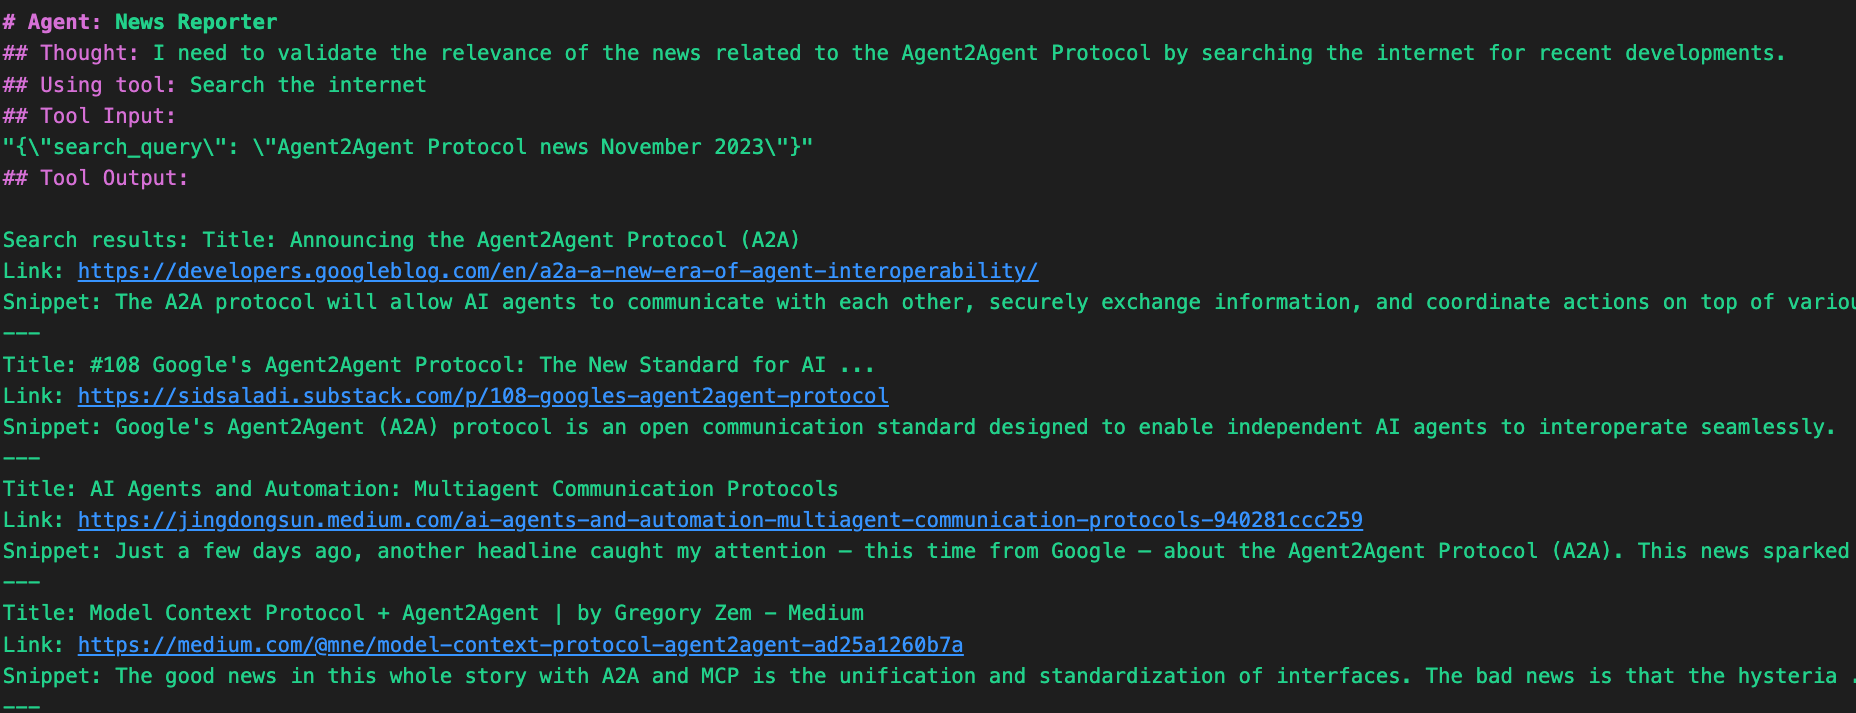
- Tool Output: It contains the results retrieved by the search tool—potentially news snippets, article summaries, or relevant URLs.
This illustrates the power of combining structured thought and external actions: rather than relying on the model's internal knowledge alone, the agent cross-checks facts using tools.
It's an example of how the ReAct pattern encourages transparency, accuracy, and verifiability in agent behavior—an essential feature for any system tasked with real-world information synthesis.
You can imagine scaling this further with multi-agent setups: a News Collector gathers raw feeds, a Fact Verifier checks reliability, and this News Reporter constructs the headline—all coordinating asynchronously using reasoning and tool-based actions.
Here's the implementation if you want to replicate the same output above.
.env file with the OPENAI_API_KEY specified in it. It will make things much easier and faster for you. Also, add these two lines of code to handle asynchronous operations within a Jupyter Notebook environment, which will allow us to make asynchronous calls smoothly to your Crew Agent.Follow these steps:
- Download Ollama from https://ollama.com.
- Run the Ollama app.
- Pull an open-source LLM.
- Define the LLM as shown below.
- Pass the LLM as the
llm parameter to the Agent.We begin by importing the essential classes from crewai and a useful tool: SerperDevTool. This tool wraps a real-time web search capability (via serper.dev) and allows our agents to fetch live information from the internet.
Also, get a Serper Dev API key from serper.dev and store it in the .env file created earlier:
Next, initialize the Web Search Tool, which the Agents can invoke when they need web results:
Moving on, define the First Agent—The News Collector:
- This agent is designed to behave like a digital journalist. Its responsibility is to gather news stories related to a given topic using the Serper tool. The
verbose=Trueflag ensures we get detailed logging—this is what creates the transparent ReAct-style trace showcased earlier. - Also, the task instructs the
News Collectorto actively search for the latest information on the specified{topic}. Thetoolparameter links the task toSerperDevTool, enabling it to actually perform the search rather than hallucinating.
Next, define the Second Agent—The News Reporter:
- This agent is the headline writer. It consumes the output from the previous task and crafts a concise headline. Like the collector, it’s also verbose—meaning we’ll see its reasoning steps, tool calls, and decisions in the logs.
- This Agent's task is particularly interesting because it challenges the reporter agent to do two things:
- Use the prior output (collected news articles).
- Perform its own validation using the search tool again—double-checking that the news is relevant.
- That’s a ReAct pattern:
- First, the agent reasons: “Do I have enough information? Is this valid?”
- Then, it acts: makes a tool call to confirm.
Moving on, we connect our agents and tasks in a sequential crew pipeline:
- The Collector performs the initial search.
- The Reporter builds and validates the headline.
Finally, we start the workflow by passing a topic: Agent2Agent Protocol. The agents will dynamically process this input, use external tools, think through their next move, and generate a validated news headline.
This produces the following verbose output, which shows how your agent "thinks" in natural language, plans its next move, and uses external tools to carry out actions.
But that’s not all. Look at one more thing towards the end of this verbose output:
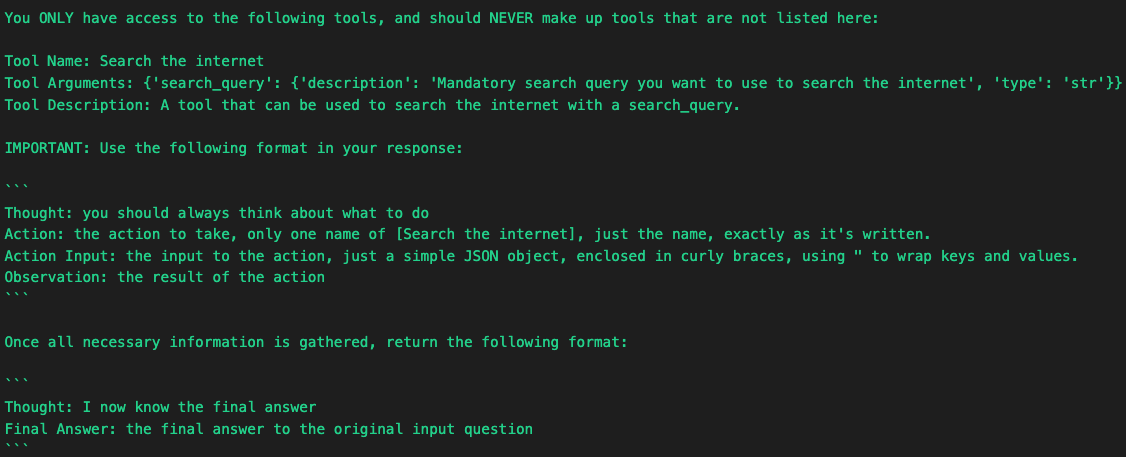
Under the hood, this ReAct-style behavior is governed by a very specific format template—what we call the action protocol. When using tools like SerperDevTool, CrewAI instructs the LLM to follow a rigid response schema. This helps ensure agents interact with tools in a safe, deterministic, and interpretable manner.
First, we have the Agent tool prompt format:
"""
You ONLY have access to the following tools,
and should NEVER make up tools that are not listed here:

Tool Name: Search the internet
Tool Arguments: {'search_query': {'description':
                 'Mandatory search query you want to use
                 to search the internet', 'type': 'str'}}
Tool Description: A tool that can be used to
                  search the internet with a search_query.

"""
This is part of the tool context injected into the LLM prompt. It tells the agent:
- What tools are available.
- What arguments are required.
- That it must not invent tools or go off-protocol.
This creates strong constraints around agent behavior—which is important when you want to avoid hallucinations or misuse of capabilities.
The prompt also includes this critical instruction:
"""
IMPORTANT: Use the following format in your response:

```
Thought: you should always think about what to do
Action: the action to take, only one name of
[Search the internet], just the name, as it's written.

Action Input: the input to the action, just a
simple JSON object, enclosed in curly braces,
using " to wrap keys and values.

Observation: the result of the action
```
"""
This is the reasoning + acting loop spelled out in literal terms:
- Thought: The agent expresses its internal reasoning.
- Action: The agent picks the tool to use—verbatim.
- Action Input: Arguments for the tool, formatted as strict JSON.
- Observation: What the tool returned (i.e., the raw output).
This schema ensures that tools can be executed reliably, logged consistently, and traced clearly. And crucially—it’s LLM-friendly. Everything is written in natural language that the model understands and responds to.
Once all information is gathered, the agent is told to conclude like this:
"""
Once all necessary information is gathered,
return the following format:

```
Thought: I now know the final answer
Final Answer: the final answer to
the original input question
```
"""
This signals the end of the reasoning chain. At this point, the agent has completed its research and can produce a confident, top-level answer.
That’s the essence of ReAct, which is implemented seamlessly using CrewAI.
But why does this matter?
ReAct was introduced as a major step in making LLM-based agents more reliable and powerful.
By having the model explain its thought process and check facts via tools, we reduce problems like hallucination and error propagation.
The original ReAct research by Yao et al. showed that this approach can overcome hallucination in question answering by letting the model retrieve real information (e.g. querying Wikipedia) to verify its facts.
It also improves the transparency of the agent’s decision-making, as we can inspect the chain of thought for debugging or trustworthiness.
Overall, the ReAct pattern turns a passive LLM into an active problem solver that can break down complex tasks and interact with external data sources, much like an autonomous assistant.
This also explains why it is widely used in almost Agentic frameworks. The actual implementation could vary but everything does connect back to something that's derived from a ReAct pattern.
To reiterate, this format:
- Forces your LLM to operate step by step,
- Clearly separates thinking from acting,
- Guarantees deterministic input-output behavior for tools,
- And produces traceable reasoning chains you can inspect or debug.
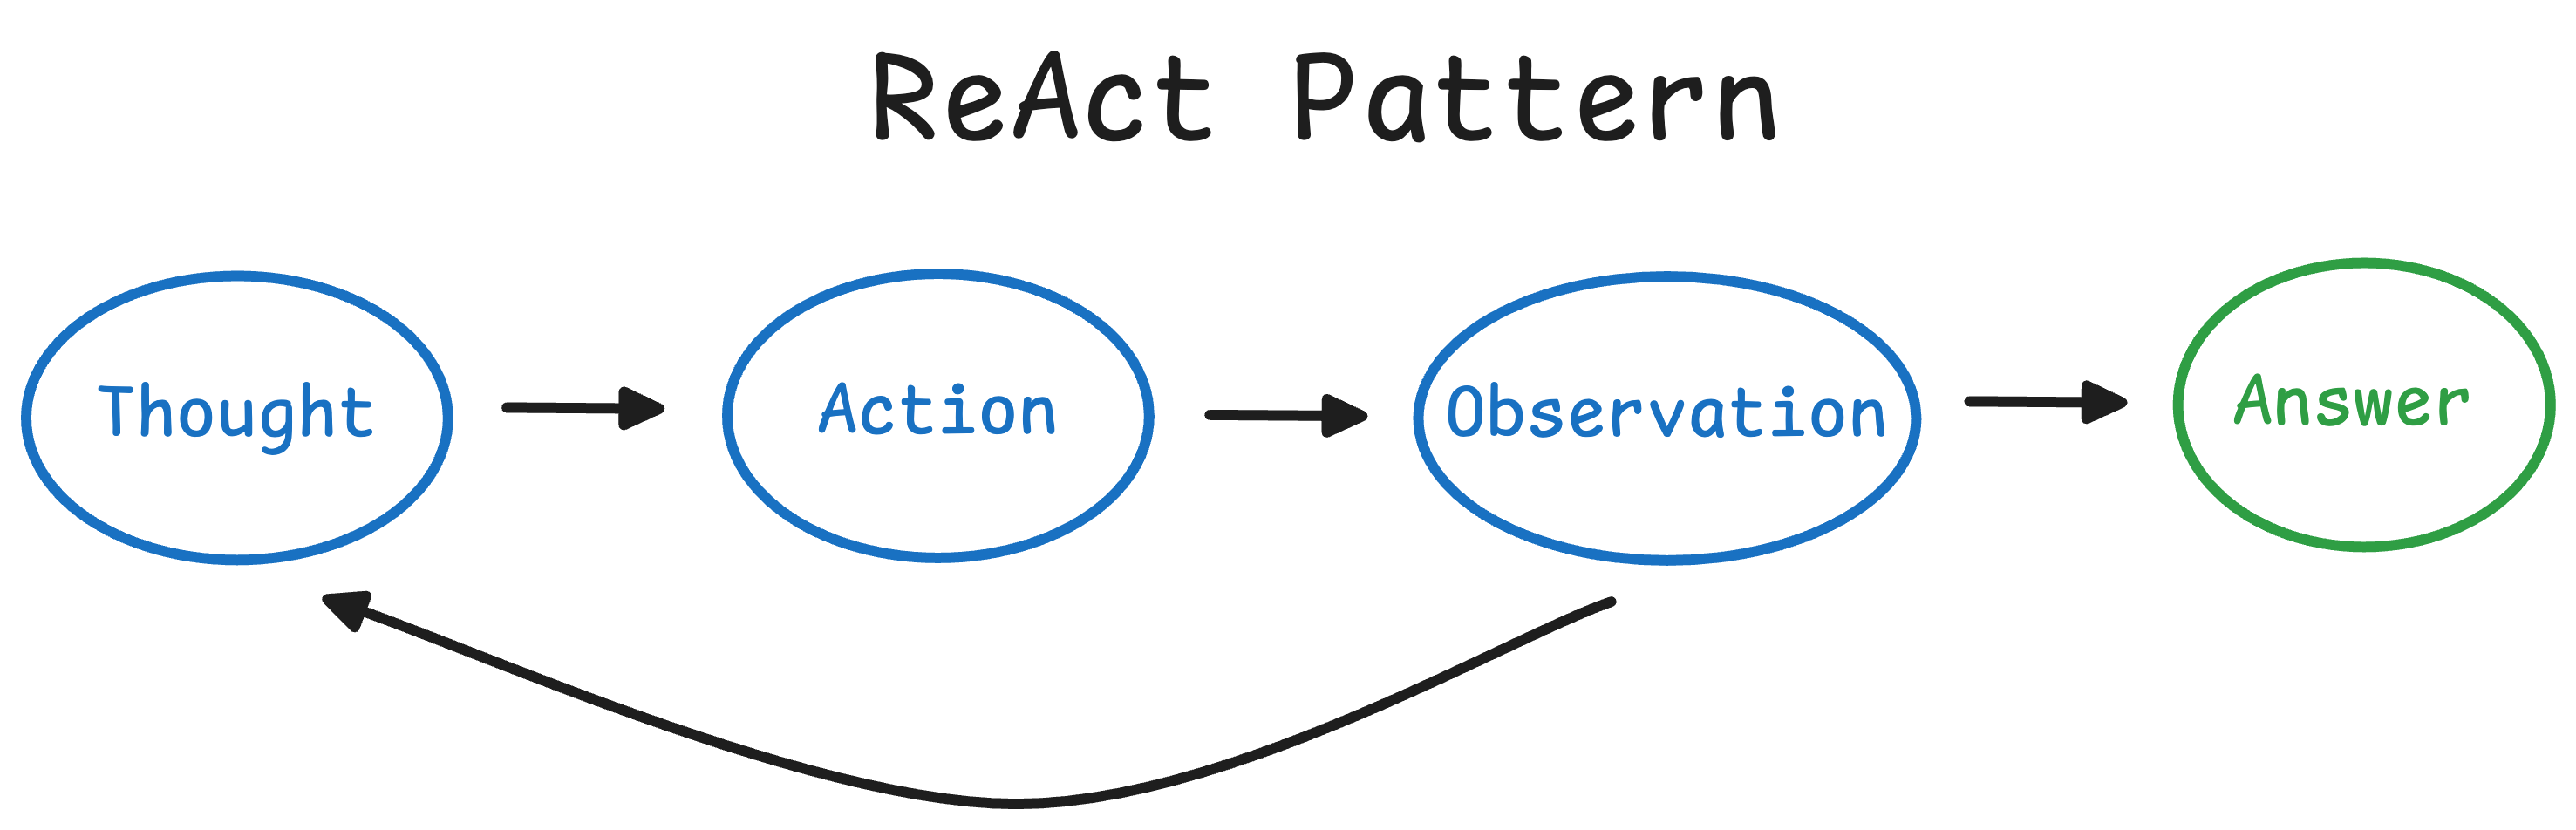
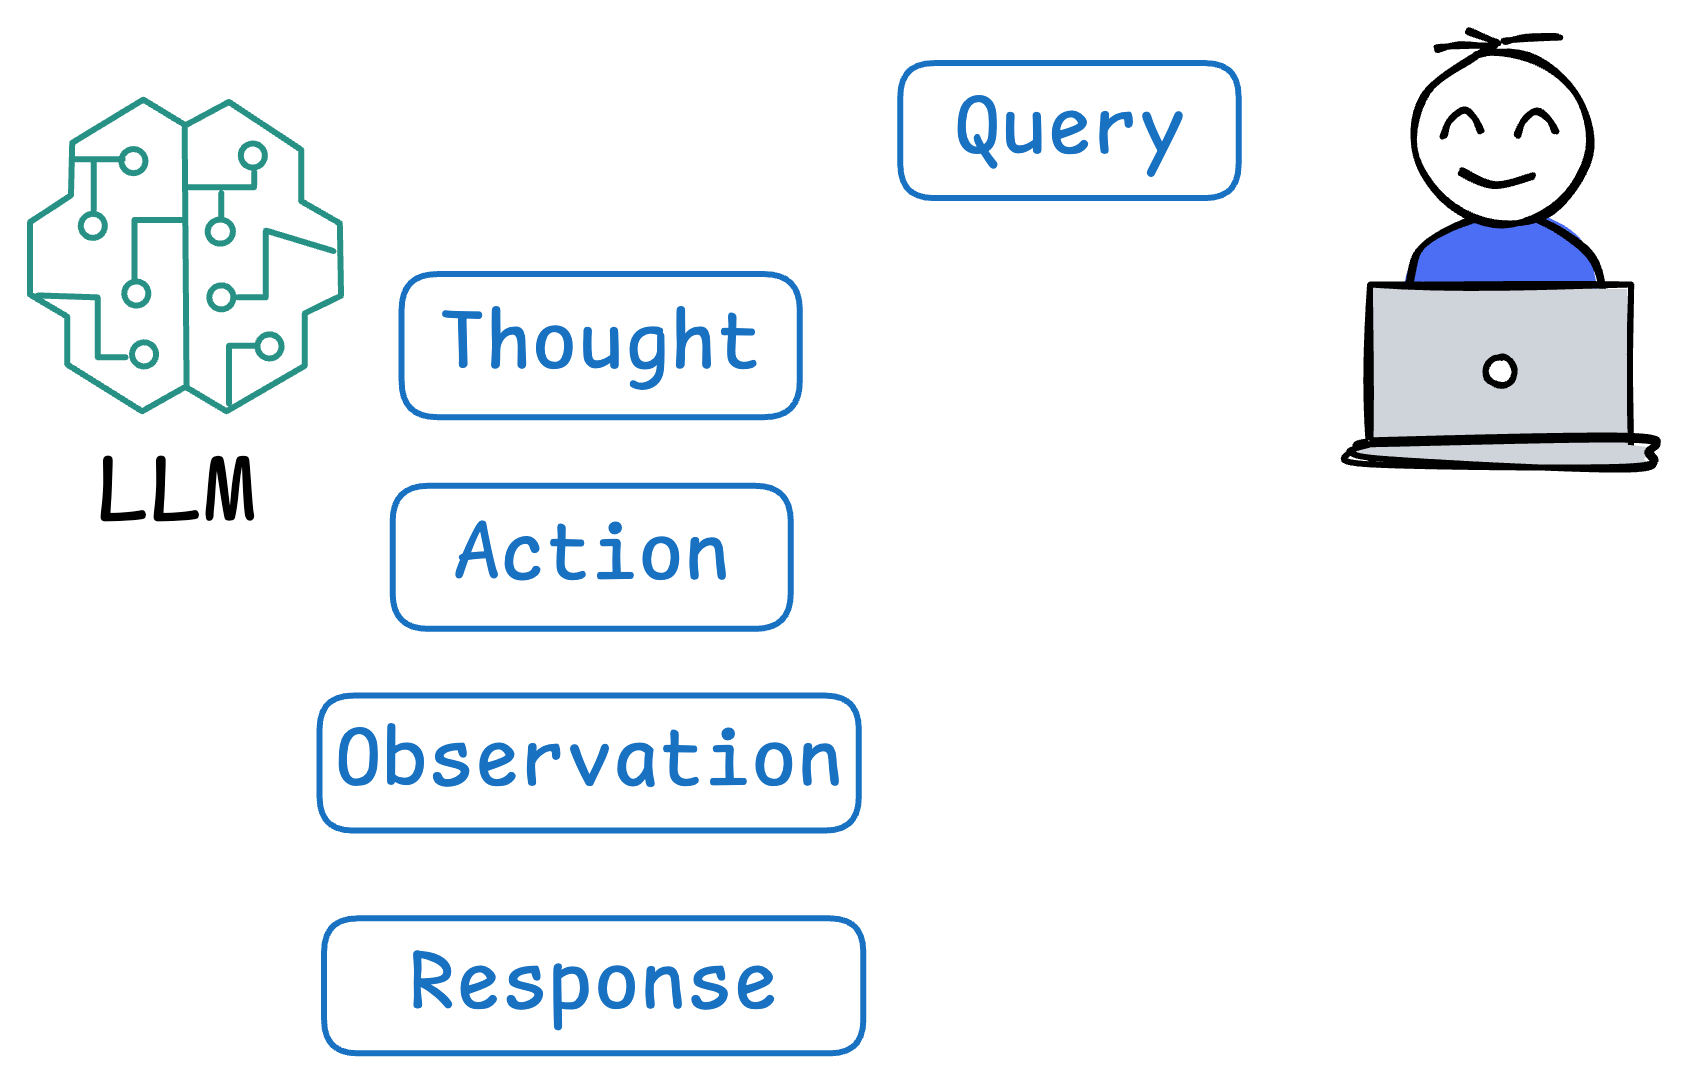
Reasoning + Acting: How ReAct Agents Work
A ReAct agent operates in a loop of Thought → Action → Observation, repeating until it reaches a solution or a final answer.
This is analogous to how humans solve problems:
- we think about what to do
- perform an action (like looking something up or doing a calculation),
- observe the result
- and then incorporate that into our next thought.
The ReAct framework uses prompt engineering to enforce this structured approach, alternating the model’s thoughts and actions/observations.
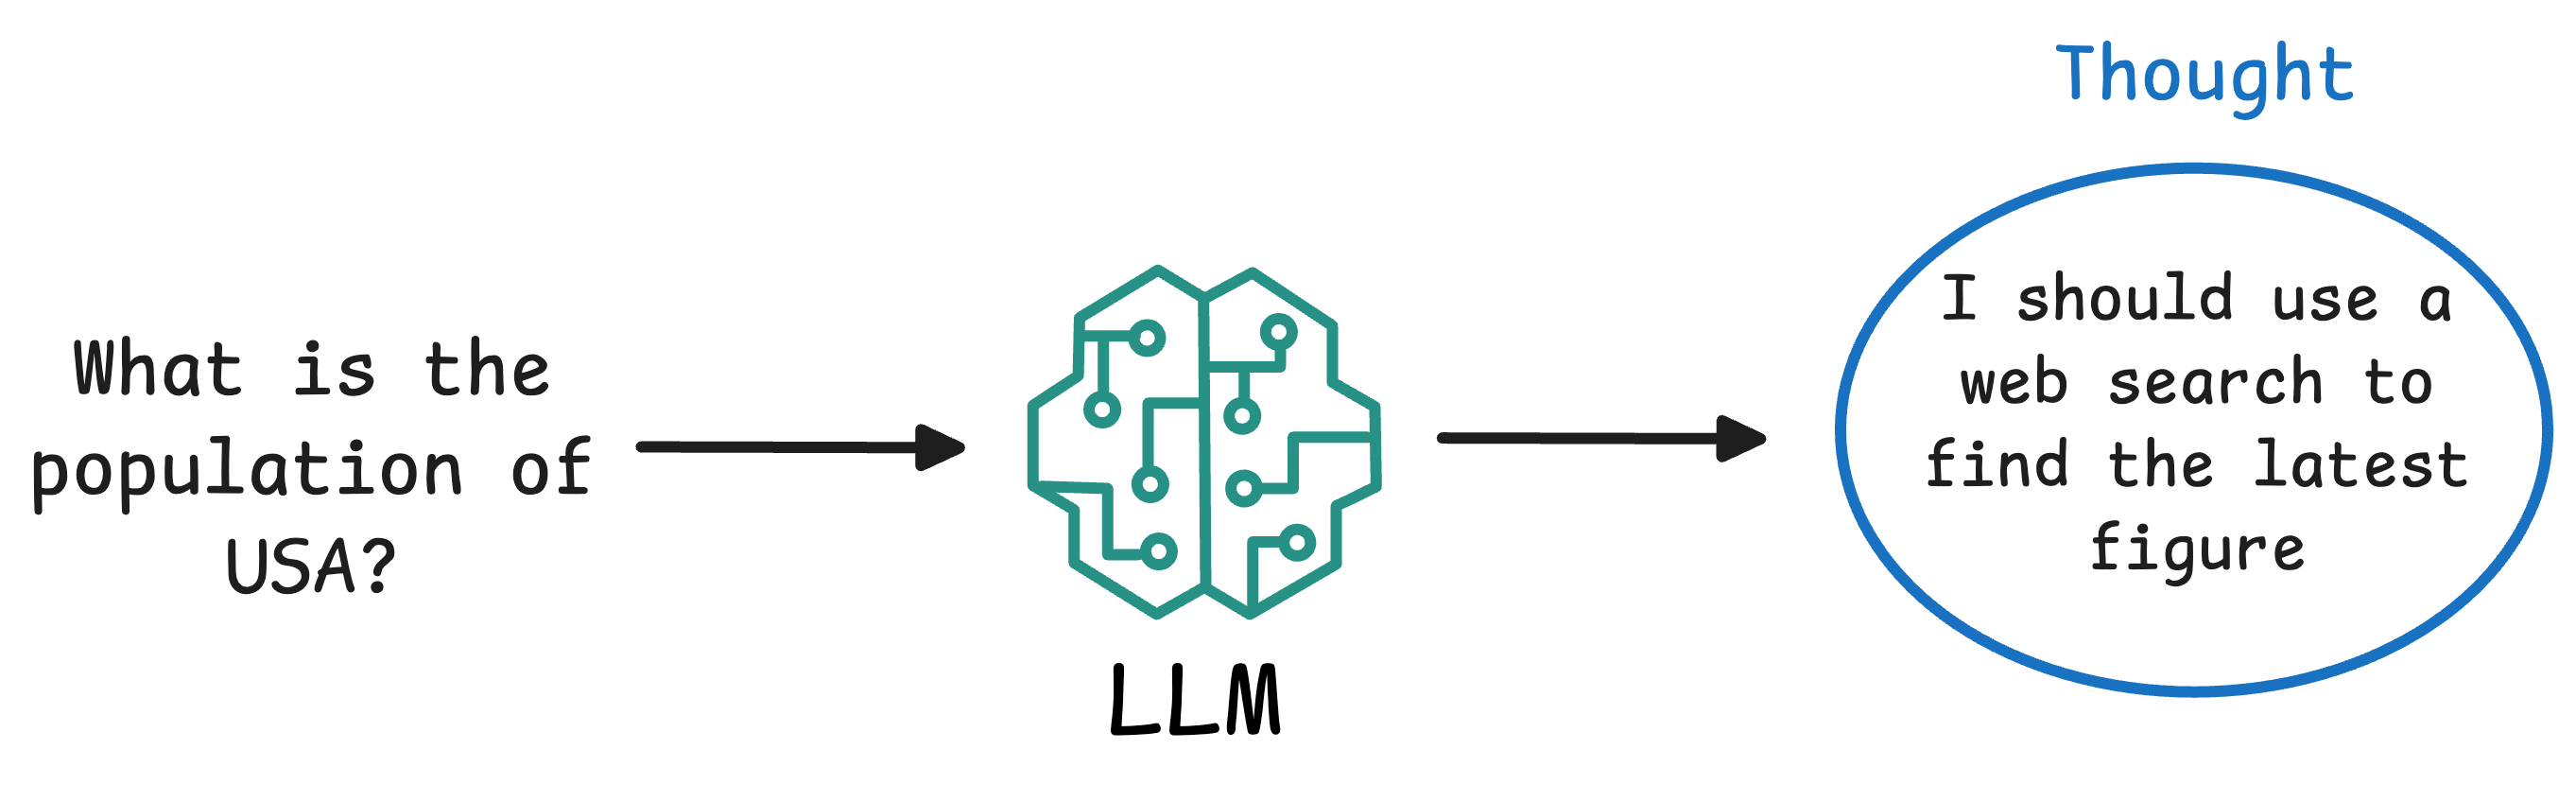
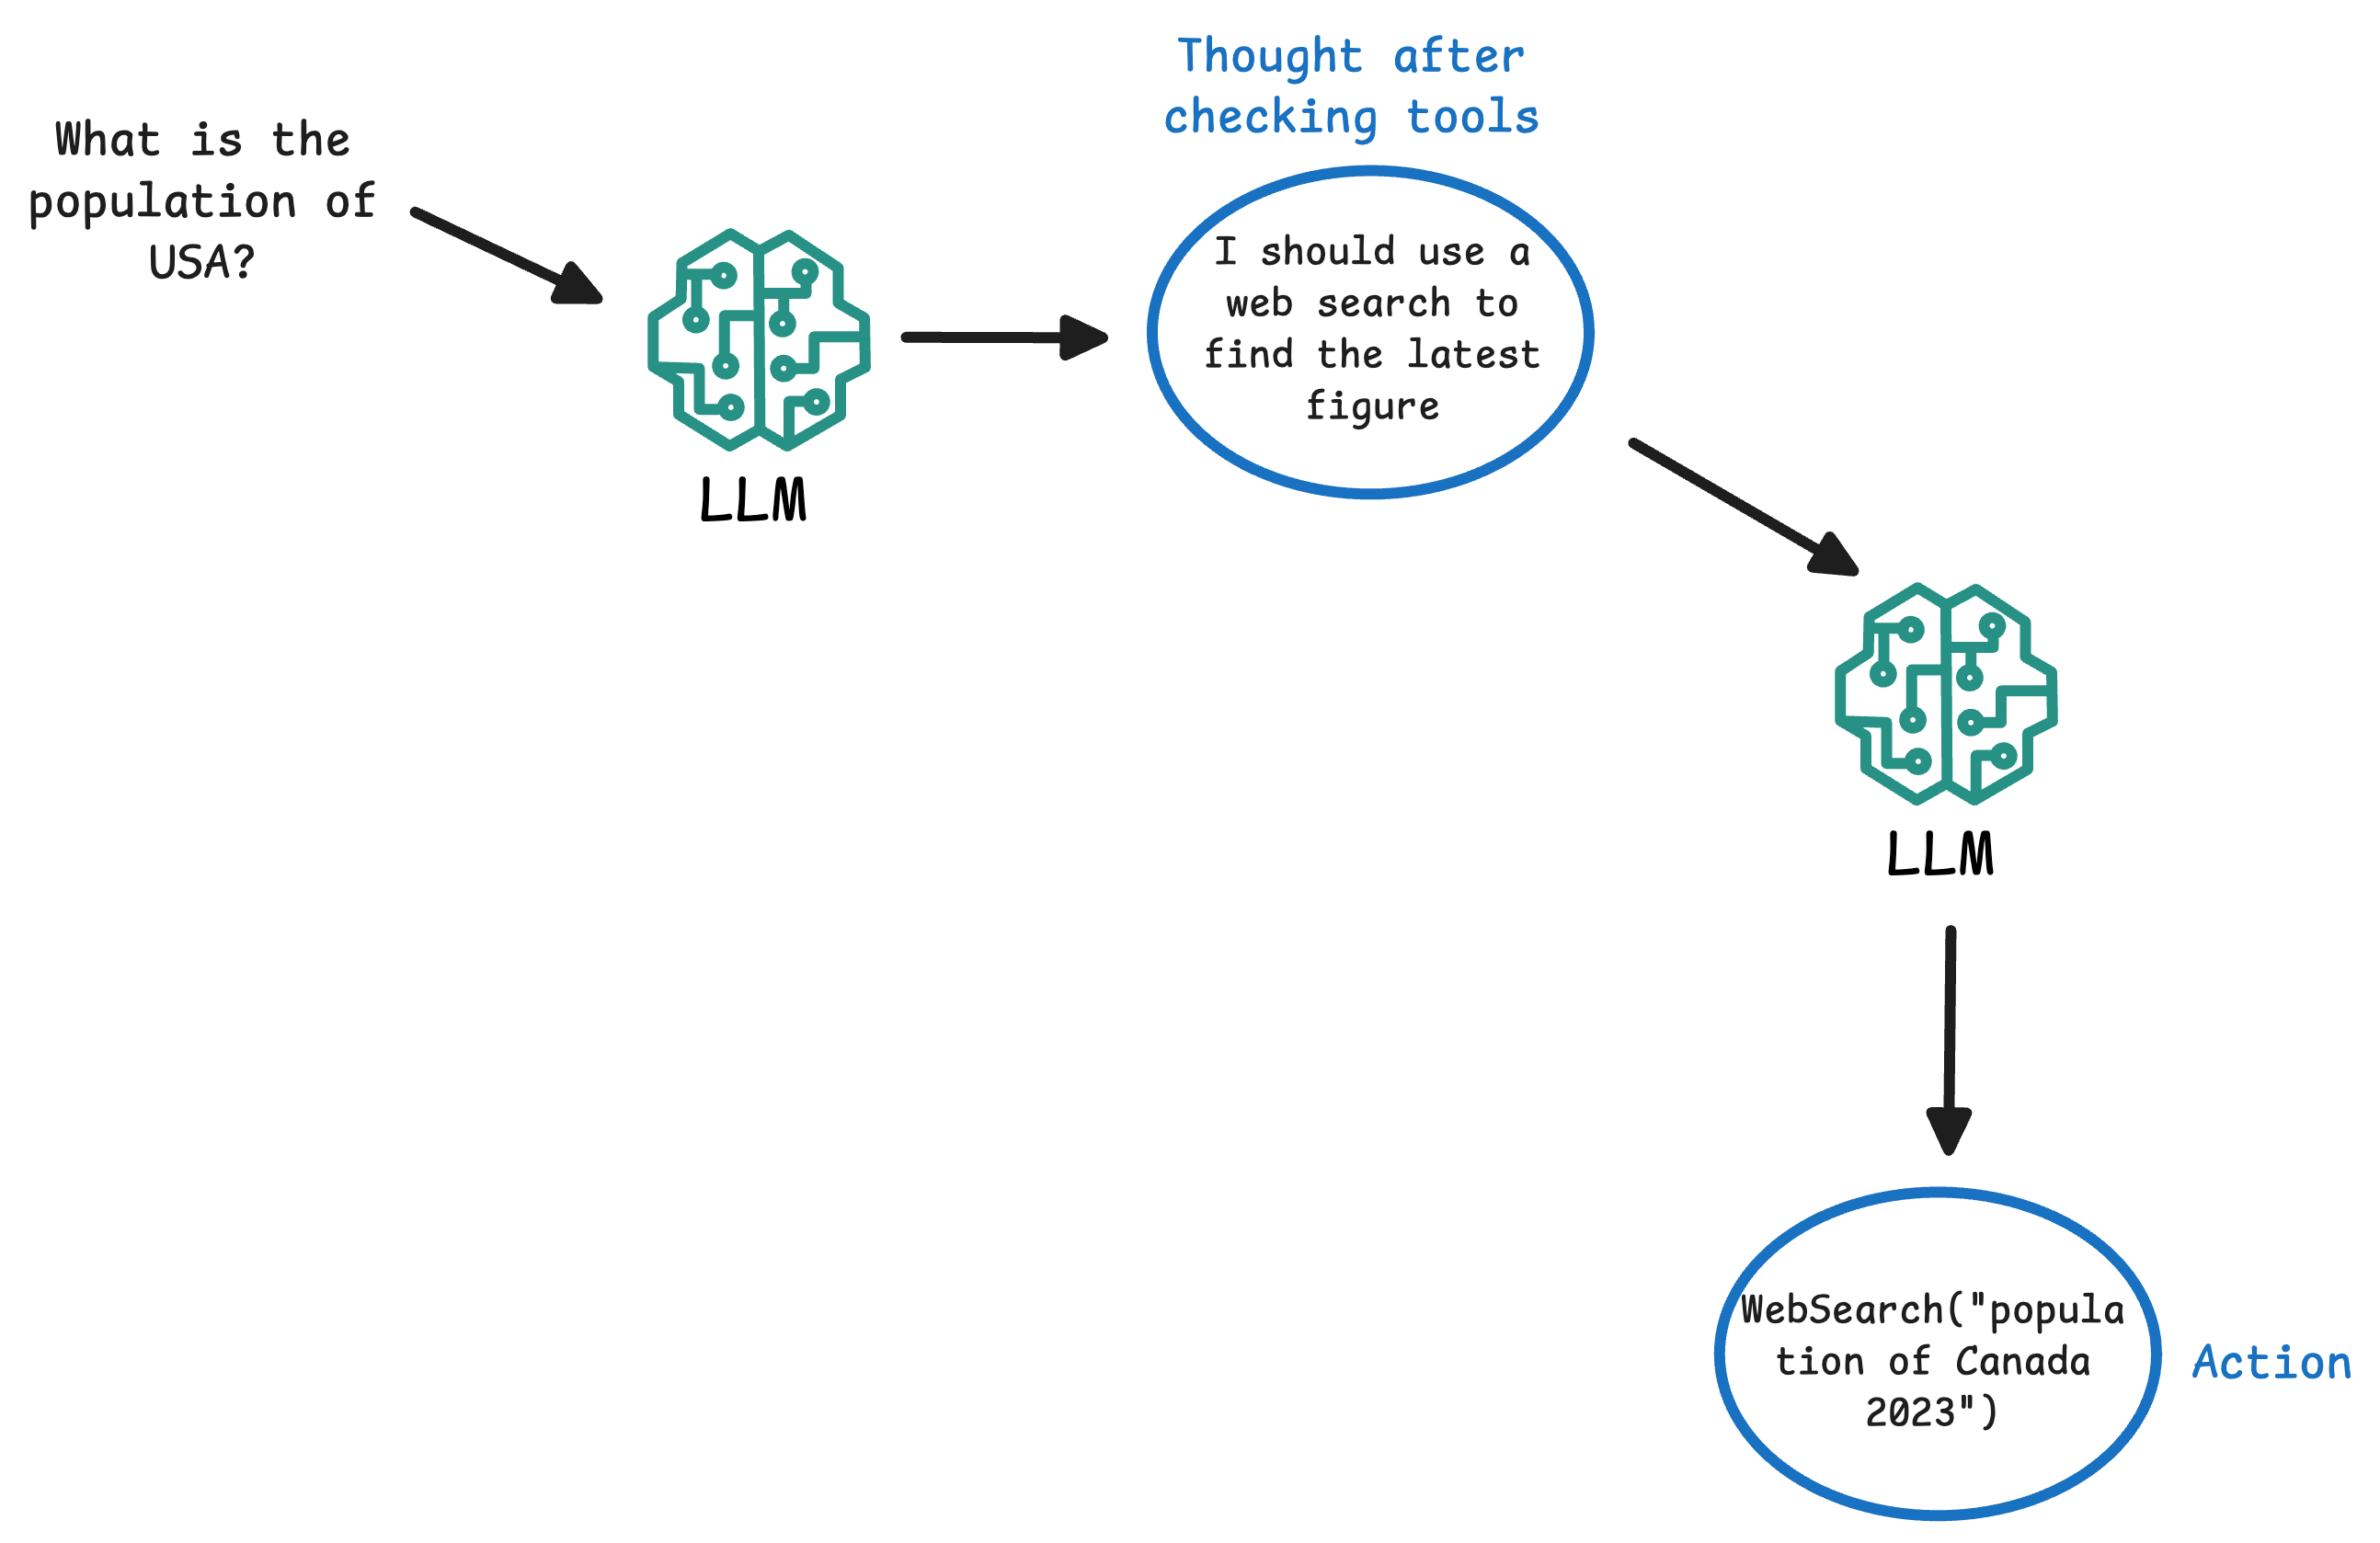
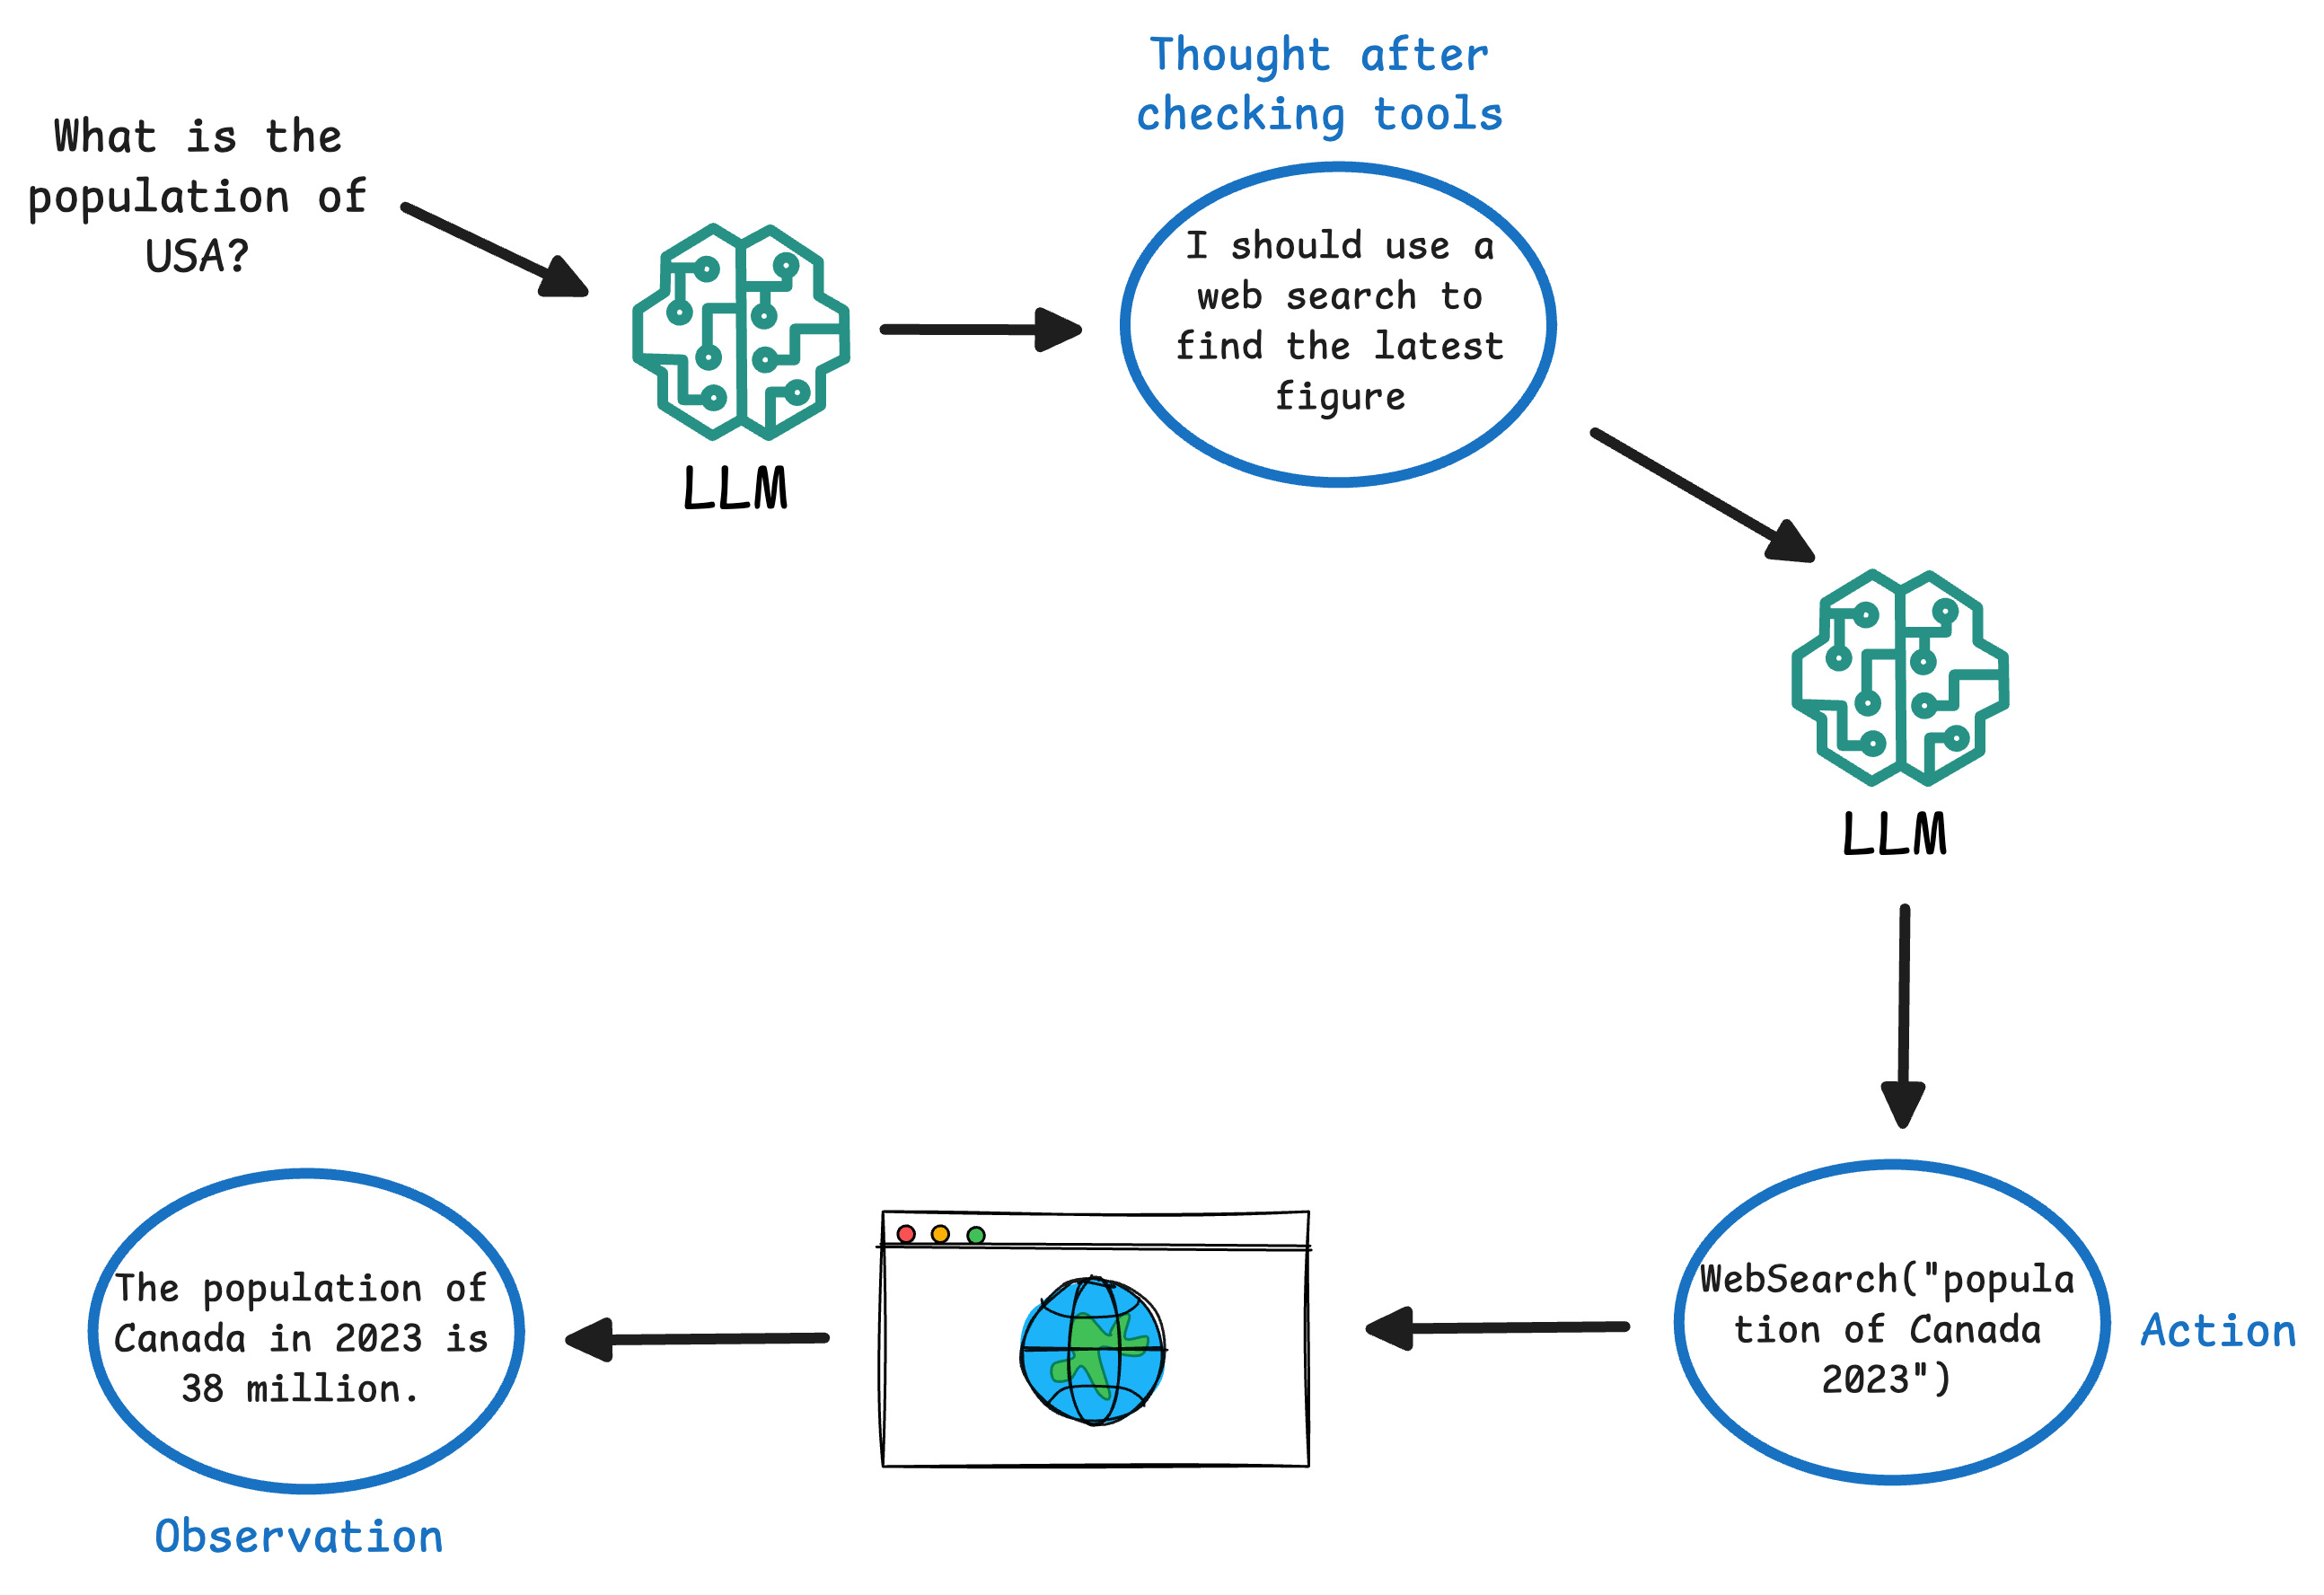
Here’s a step-by-step breakdown of the ReAct cycle in an AI agent:
- Thought: The Agent (powered by an LLM) analyzes the user’s query and internal context, and produces a reasoning step in natural language. This is typically not shown to the end user but is part of the agent’s self-talk. For example: “The question asks for the population of a country; I should use a web search to find the latest figure.”
- Action: Based on the thought, the agent decides on an external tool or operation to perform. It outputs a prescribed format indicating the action. For instance:
Action: WebSearch("population of Canada 2023"). The agent essentially “calls” a function (tool) by name, often with some input parameters.
- Observation: The agent’s environment (our code) executes the requested action and returns the result (observation) back to the agent. For example, the web search tool might return: “
Observation: The population of Canada in 2023 is 38 million.” This observation is fed into the agent’s context.
- The agent takes the new information and goes back to step 1 (another Thought). It will reason with the fresh data. In our example, it might think: “Now I have the population figure; I can answer the question.”
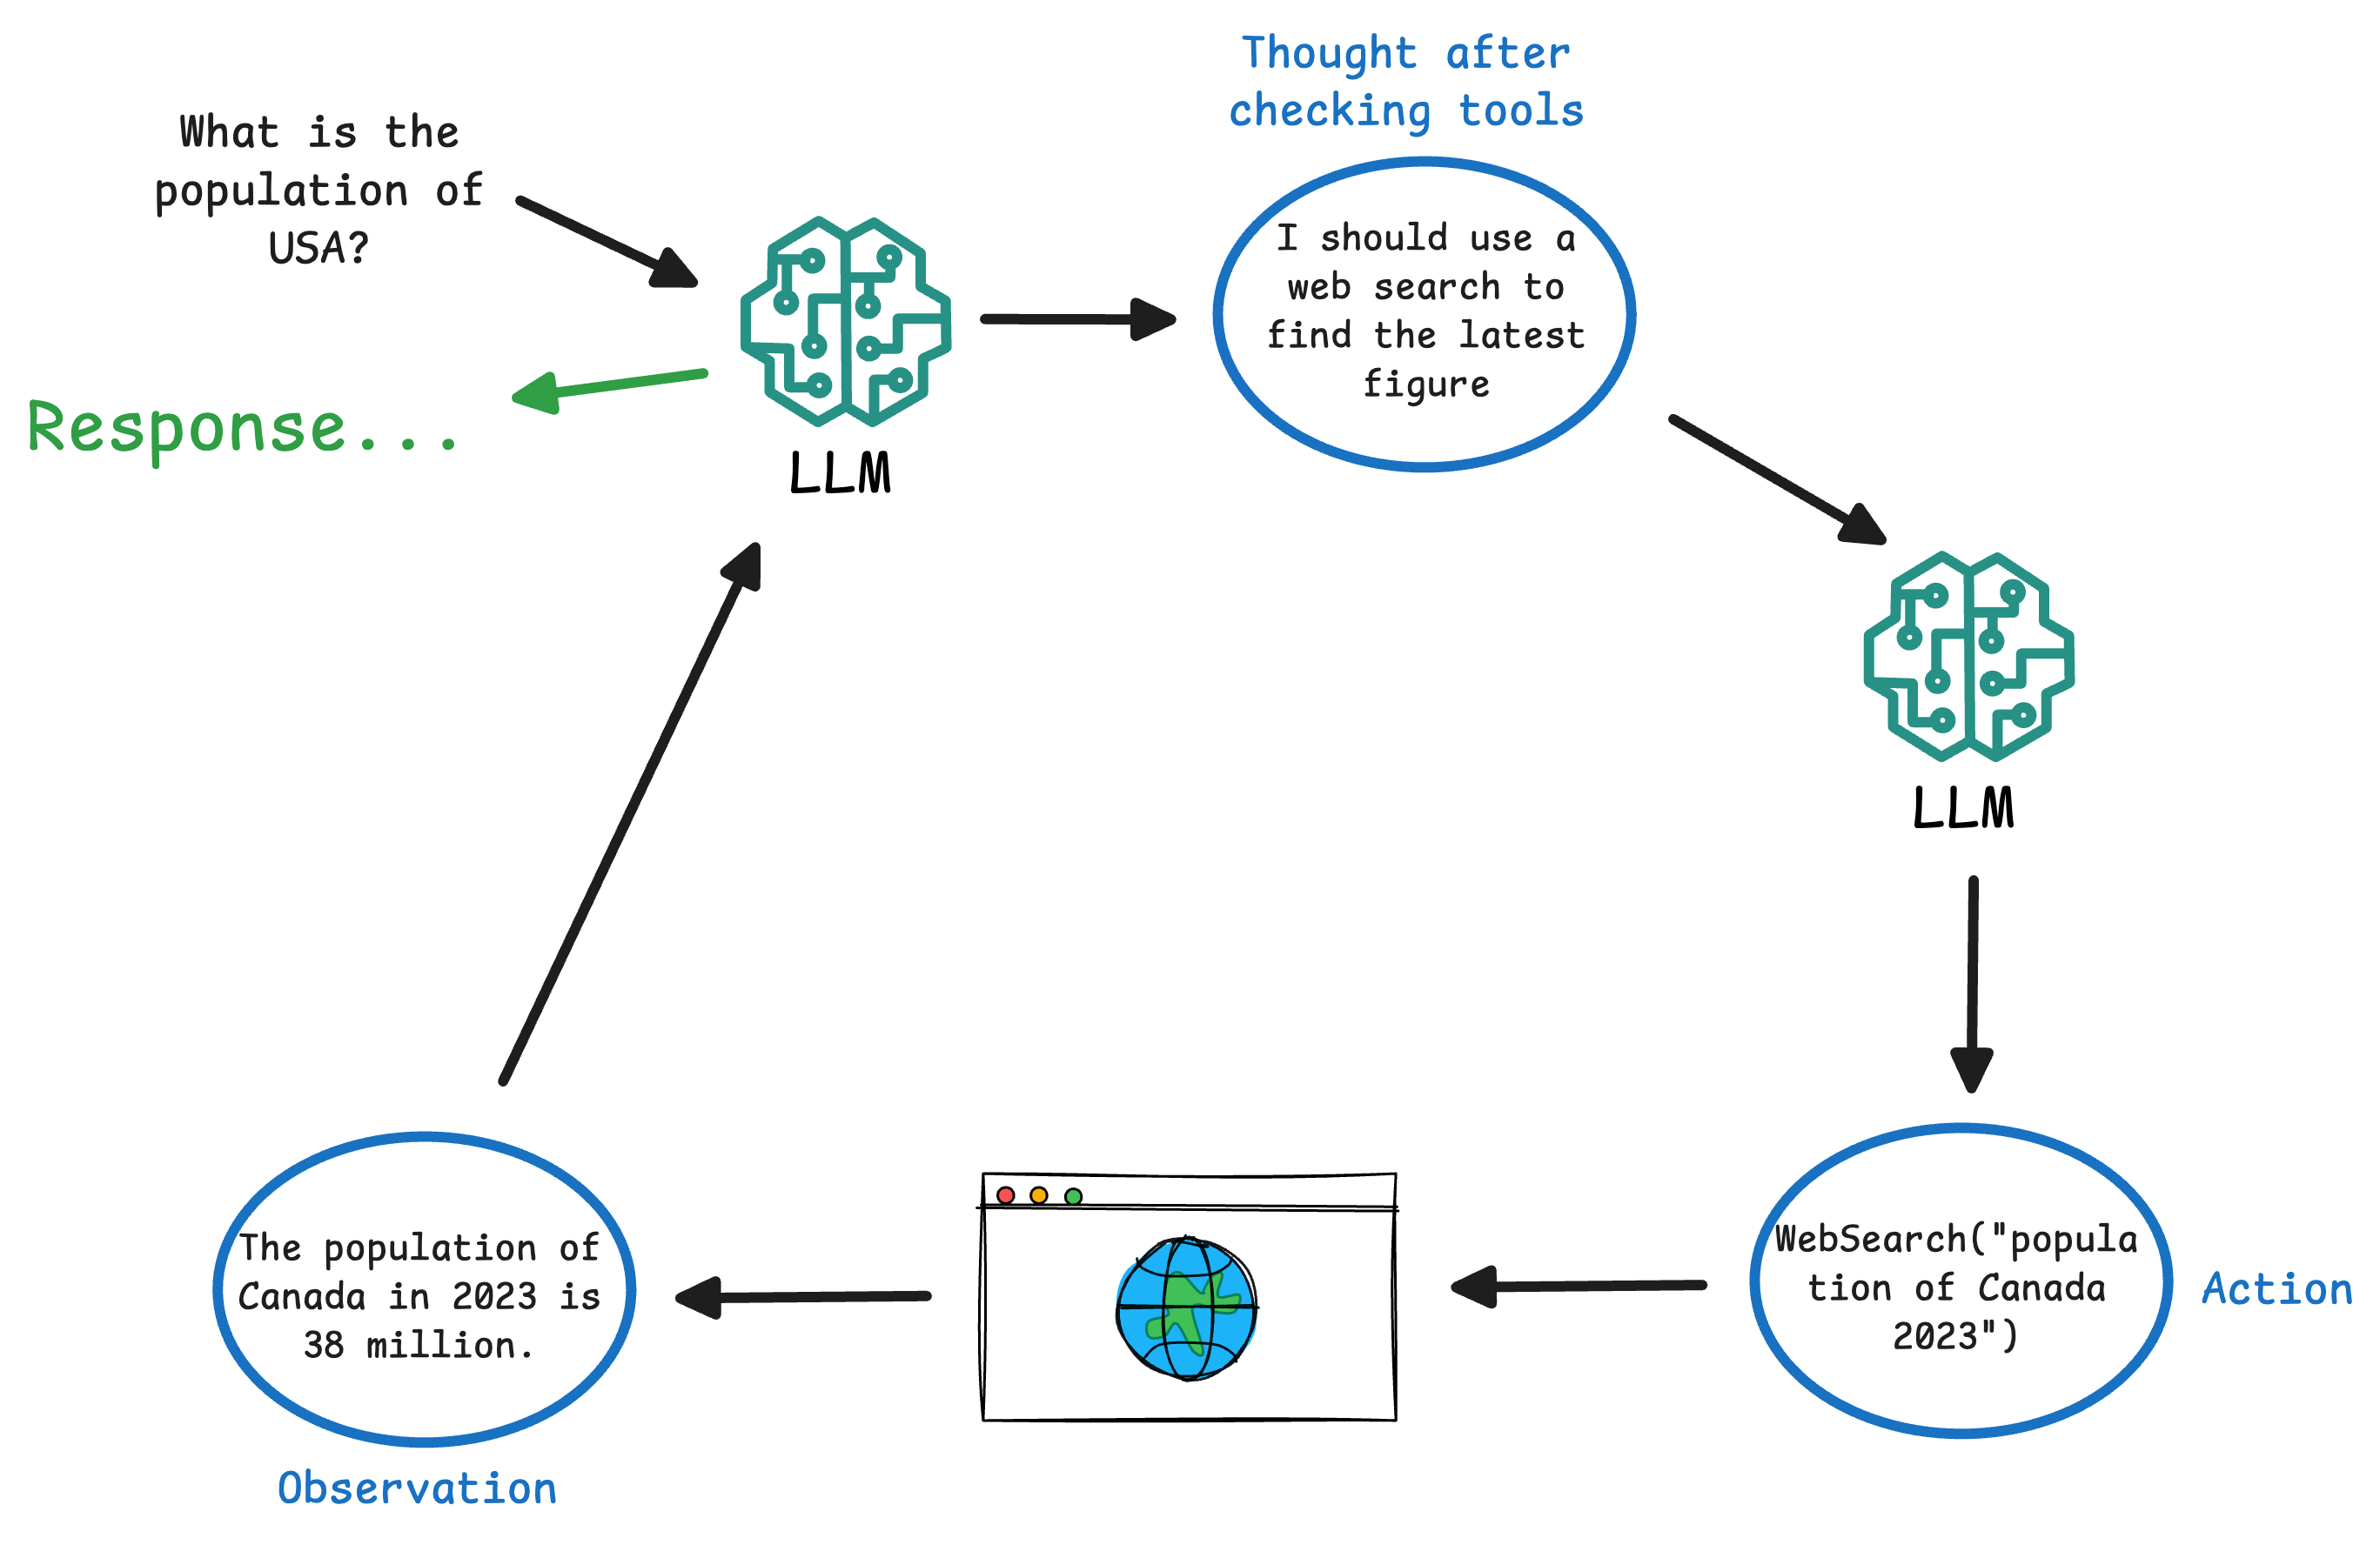
- This Thought/Action/Observation cycle repeats, allowing the agent to chain multiple tool uses if needed (search, then maybe a calculation, then another search, etc.). Eventually, the agent decides it can answer the user. At that point, instead of an Action, it outputs a Final Answer (sometimes marked as
Answer:orFinal Answer:in the format).
As we shall see shortly in the implementation from scratch, throughout this process, the agent maintains the conversation and its own intermediate steps.
Each Thought and Observation can be appended to the dialogue context so the LLM remembers what it has done so far.
This is crucial for coherence. The end result is that the agent effectively plans its approach on the fly, mixing reasoning and acting.
This dynamic approach is much more adaptable than a rigid script or a single-turn response. It allows handling unforeseen sub-tasks, similar to how humans adjust plans when new information comes up.
It’s important to note that all these “Thought” and “Action” annotations are not magical features of the LLM—they come from how we prompt the model.
As we shall see below, we explicitly instruct the model to format its responses in this structured way. In other words, ReAct is implemented via carefully crafted prompt templates and parsing logic, not via any built-in LLM ability.
The LLM is guided to behave like an agent that reasons and acts, through the examples and instructions we give it.
Now that we understand the ReAct pattern conceptually, we can start building our own agent that follows this logic. We’ll need a language model to serve as the agent’s brain, some tools the agent can use, and a loop that ties them together.
In the next section, we’ll step away from CrewAI and build a ReAct agent from scratch—in pure Python, using only local LLMs and a simple set of tool definitions. You'll see that everything we covered here is not magic—it’s just smart prompt design combined with controlled I/O.
.env file with the OPENAI_API_KEY specified in it. It will make things much easier and faster for you. Also, add these two lines of code to handle asynchronous operations within a Jupyter Notebook environment, which will allow us to make asynchronous calls smoothly to your Crew Agent.ReAct Implementation from Scratch
Below, we shall implement a ReAct Agent in two ways:
- Manually executing each step for better clarity.
- Without manual intervention to fully automate the Reasoning and Action process.
You can download the code below: