Practical MCP Integration with 4 Popular Agentic Frameworks
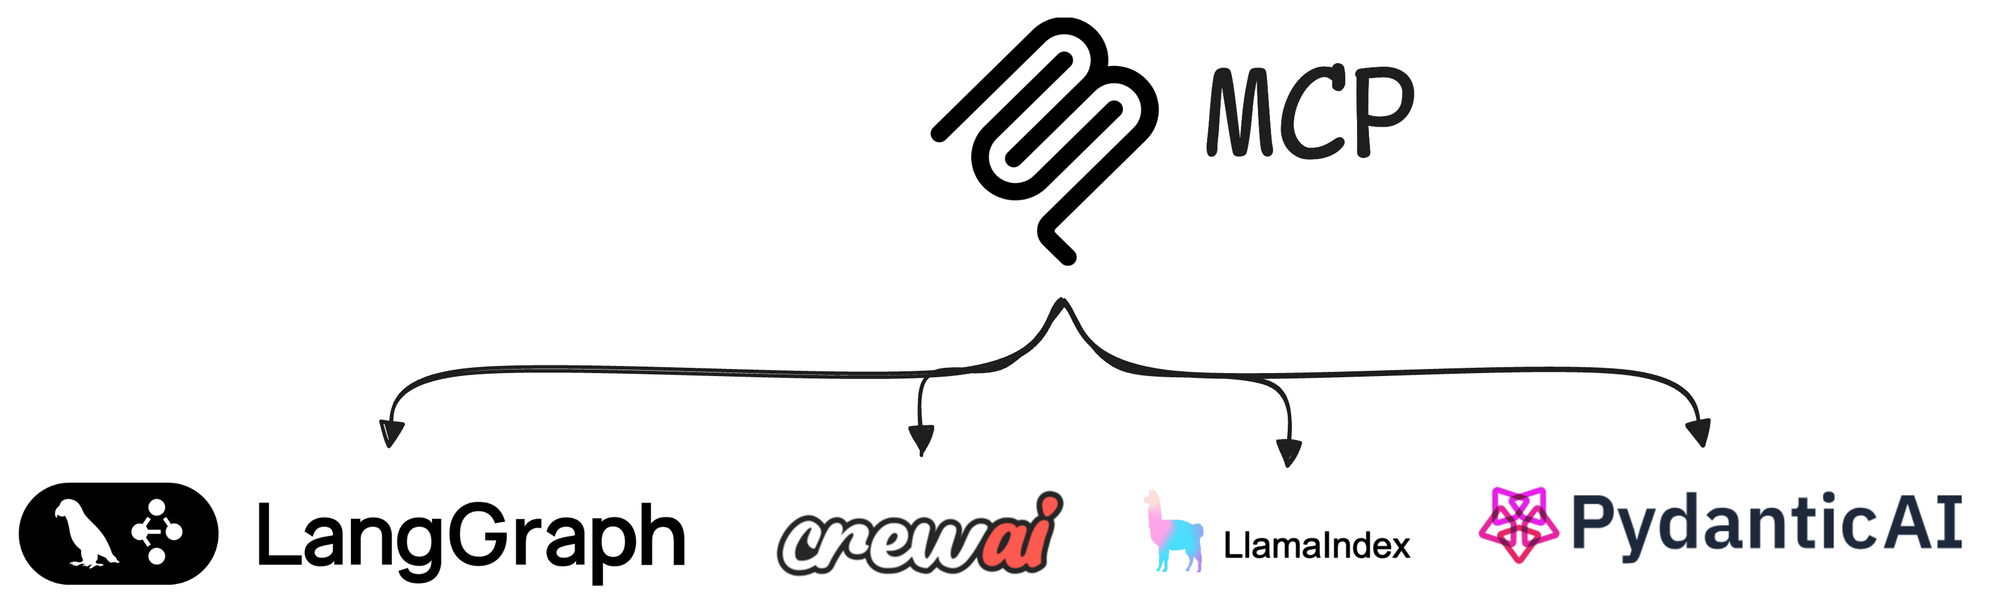
MCP Part 8: Integration of the model context protocol (MCP) with LangGraph, LlamaIndex, CrewAI, and PydanticAI.
Recap
Before we dive into Part 8 of the MCP crash course, let’s briefly recap what we covered in the previous part of this course.
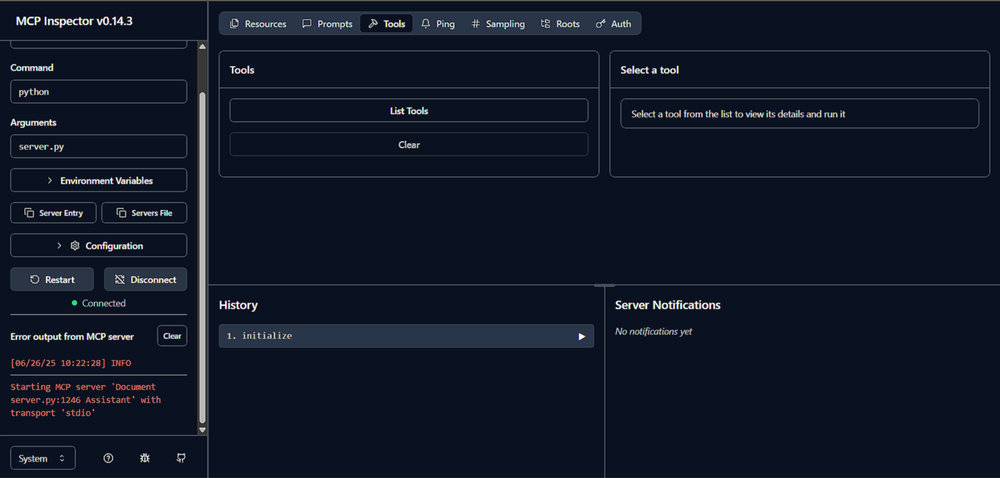
In Parts 6 and 7, we explored testing, security, and sandboxing in MCP-based systems. We began by examining MCP Inspector, a powerful tool that allows developers to visualize and debug interactions with MCP servers effectively.
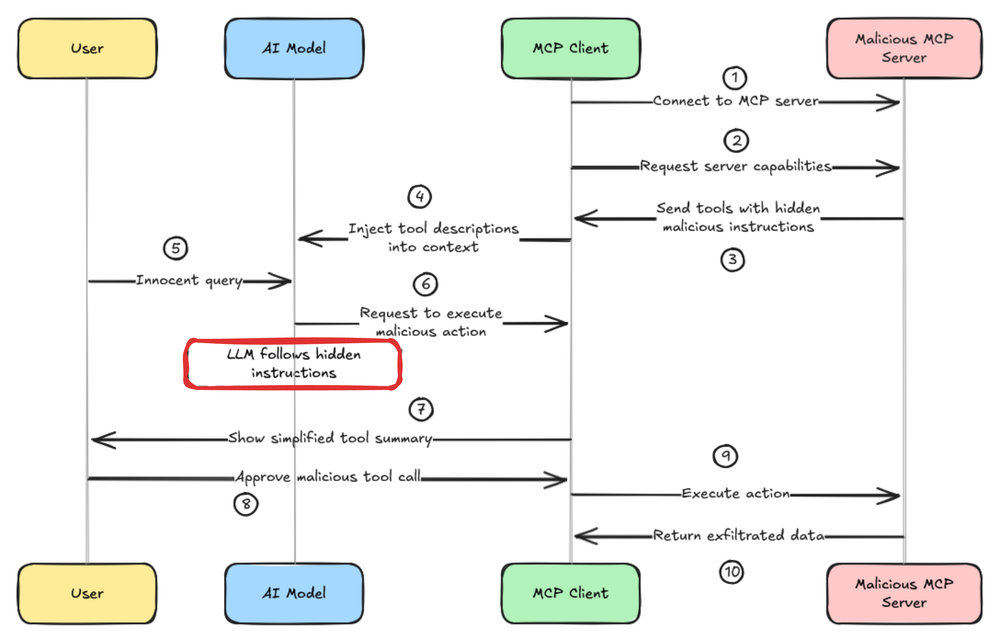
Next, we discussed several key security vulnerabilities in MCP systems, including prompt injection, tool poisoning, and rug pull attacks, along with strategies for mitigating these risks.
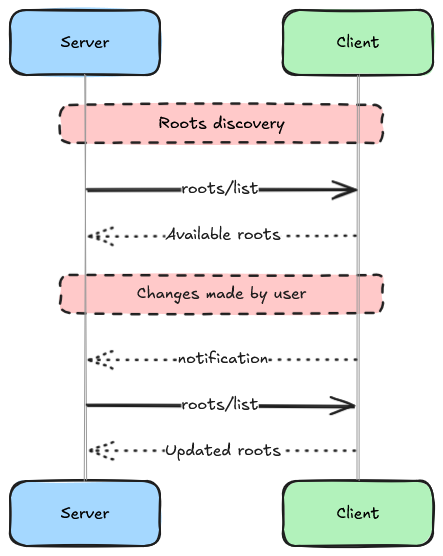
We also explored MCP roots and how they can help limit unrestricted access, reducing potential security threats.
We then turned our focus to containerization and sandboxing techniques for MCP servers to enhance security and ensure reproducibility.
This included writing secure Dockerfiles for FastMCP servers, implementing hardened settings such as read-only filesystems, memory limits, and other container-level restrictions to reduce the attack surface.
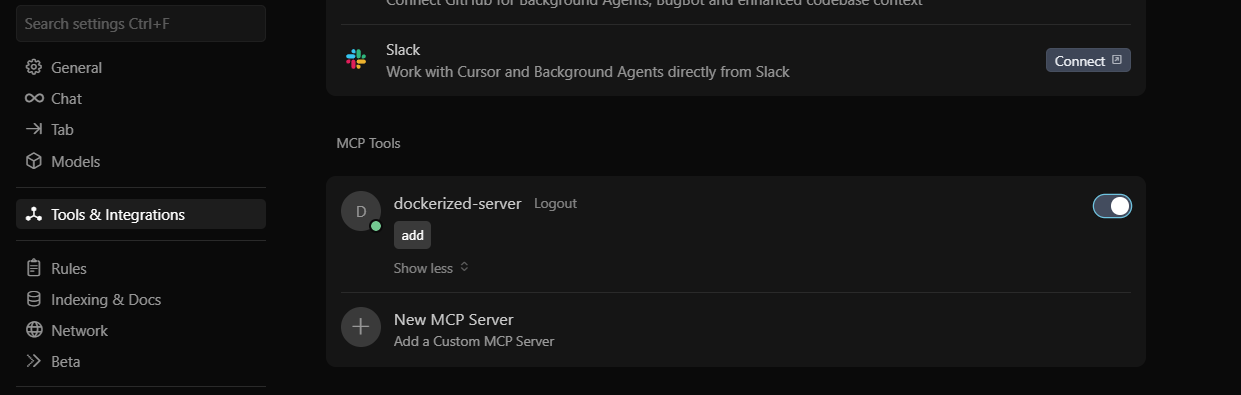
Additionally, we covered how to integrate sandboxed servers with tools like Claude Desktop, Cursor IDE, and custom clients.
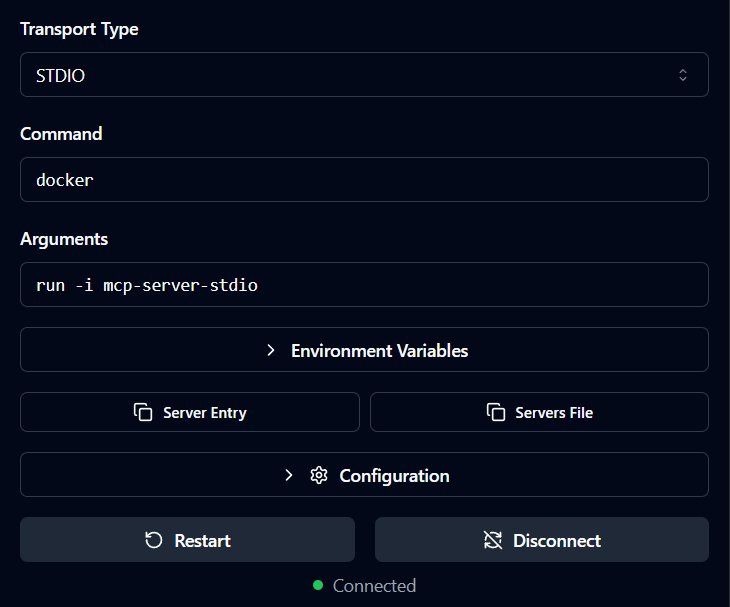
Finally, we demonstrated how to test these sandboxed servers using MCP Inspector, including connecting both STDIO and SSE-based sandboxed servers for debugging and inspection.
By the end of Part 7, we had a clear picture of how to examine and build secure environments for end-to-end cooperative intelligence systems developed with MCP.
If you haven’t studied Parts 6 and 7 yet, we strongly recommend going through them first. You can find them below:

What’s in this part
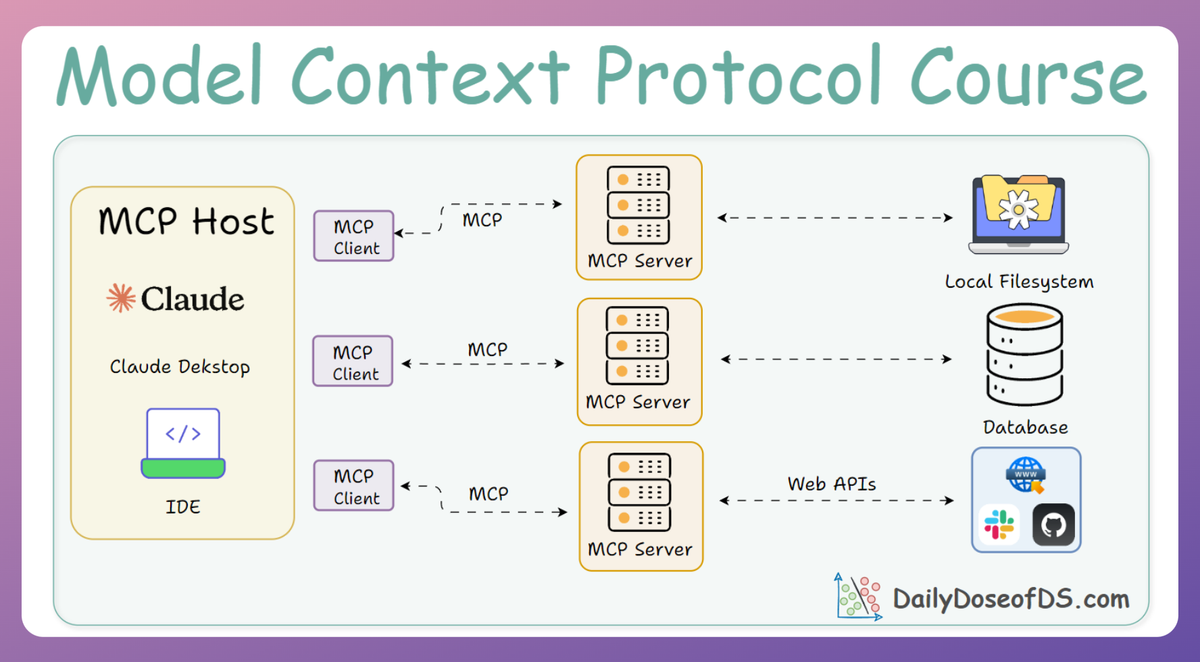
In this chapter, we shift our focus to the integration of the model context protocol (MCP) with some of the most widely used agentic frameworks: LangGraph, LlamaIndex, CrewAI, and PydanticAI.
Previously, in our AI agents crash course, we explored how agents reason, invoke tools, and manage state:
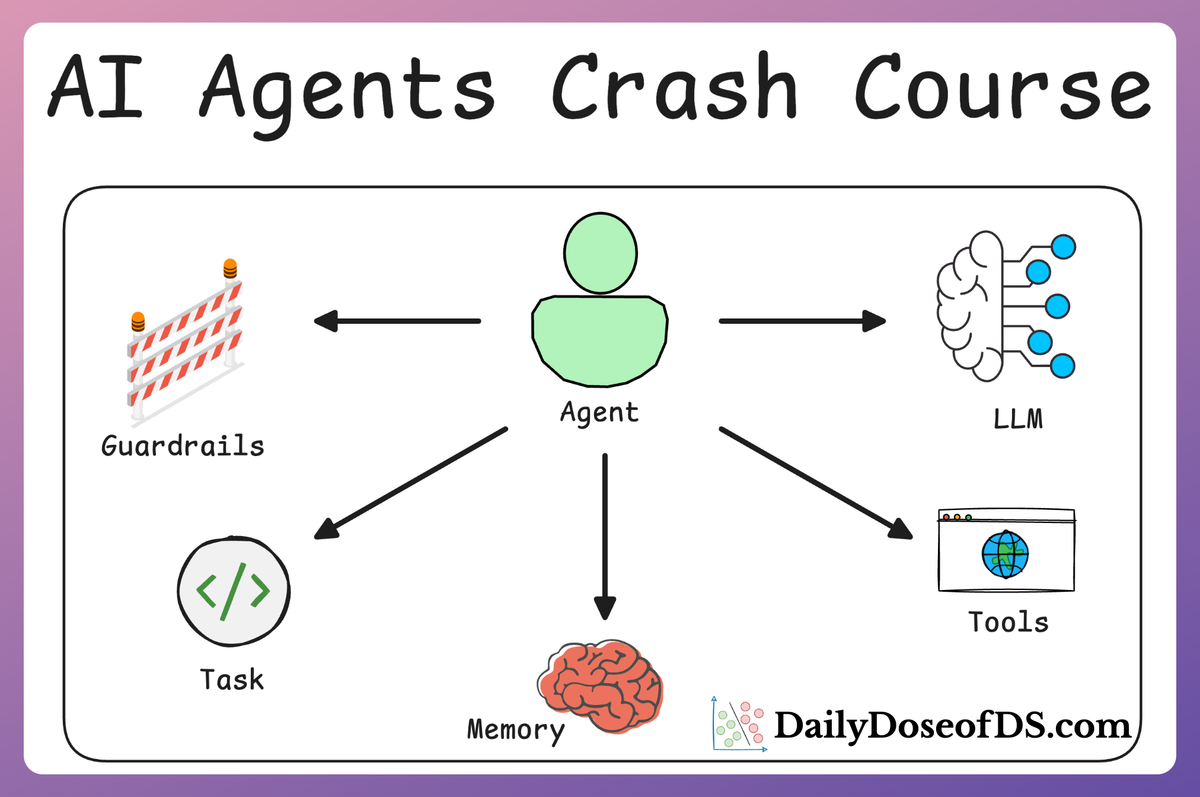
But one essential question remains: how can they interface with external systems and access dynamic capabilities in a standardized manner that MCP provides?
Thus, in this part, we'll explore how MCP enables clean, extensible, and reliable integration with frameworks that are powering modern AI agents.
MCP integration not only expands an Agent’s capabilities but also brings new responsibilities. It introduces interoperability, remote procedure access, and modular system composition. At the same time, it requires careful design to maintain isolation, trust, and correctness.
Here’s what we’ll explore:
- Some recent advancements in the realm of MCP.
- A clear and concise primer on each of the four frameworks.
- Step-by-step guides for connecting MCP into each framework.
This chapter is practical, detailed, and grounded in the realities of building agentic systems.
Each topic will be accompanied by detailed implementations, ensuring that you not only grasp the idea behind it but can also perform integrations into your own stack.
Let’s begin.
Recent developments
Before getting into the core of this chapter, where we'll explore the integration of MCP in modern Agentic frameworks, we'd like to take some time to address some of the recent updates in the MCP world.
Ever since we started this crash course, several significant developments have emerged that are important to acknowledge.
So in this section, we will briefly highlight some of these key updates and provide useful links to help you stay informed as new information becomes available.
Streamable HTTP transport
Streamable HTTP is a modern, efficient transport for exposing your MCP server via HTTP. It is the recommended transport for web-based deployments.
To run a server using streamable HTTP, you can use the run() method with the transport argument set to "http". This will start the server on the default host (127.0.0.1), port (8000), and path (/mcp/).
"http" is accepted as a transport name, you can also pass "streamable-http" as a fully supported alias.We can also specify the host and port parameters similar to how we did for sse:
On the client side, to successfully connect to streamable HTTP servers, we can use the following approach:
With this, we’ve covered an overview of how to use the streamable HTTP transport mechanism.
It's important to note that the SSE transport is deprecated and may be removed in a future version. While we have used SSE in several places for demonstration purposes, and will continue to use it in this chapter as well, newer applications should prefer the streamable HTTP transport instead.
Finally, we’d like to mention one more important point: from now on, when using SSE (as long as it remains supported), the client should explicitly use the SSETransport to connect to the server:
We covered the core idea but for further exploration, you can find more details on this topic at the following link:

Now, let us take a look at another very recent development: Elicitation.
Elicitation
This is a new feature in version 2.10.0 of FastMCP. User elicitation allows MCP servers to request structured input from users during tool execution.
Instead of requiring all inputs upfront, tools can interactively ask for missing parameters, clarification, or additional context as needed.
Elicitation enables tools to pause execution and request specific information from users. This is particularly useful for:
- Missing parameters
- Clarification requests
In order to utilize elicitation on the server-side, use the ctx.elicit() method within any tool function to request user input:
The elicitation result contains an action field indicating how the user responded:
accept: User provided valid input; data is available in thedatafielddecline: User chose not to provide the requested information and the data field isNonecancel: User cancelled the entire operation and the data field isNone
Now let us take a look at how we can handle elicitation on the client-side.
Elicitation requires the client to implement an elicitation handler. If a client doesn’t support elicitation, any invocation of ctx.elicit() will raise an error indicating that elicitation is not supported.
Let us take a look at how we can implement a basic handler on the client-side for elicitation:
In the above code:
- Line 7: We show the message from the server.
- Line 9: We ask the user to provide input.
- Line 12-14: If the user provides no input, we return an object of the
ElicitResultclass with adeclineaction. - Line 19: If the user provides an input, we return it after wrapping it in the right format.
- Line 22-25: The Client integrates the server and runs it with an
elicitation_handlerto introduce support for Elicitation.
FastMCP automatically converts the server’s JSON schema into a Python dataclass type, making it easy to construct the response.
We can also observe that the implementation patterns for elicitation are quite similar to the ones we saw for sampling.
With this, we covered the core idea behind elicitation. For a deeper dive, check out the following links:


Claude Desktop support
Claude Desktop now supports MCP servers both through local STDIO connections and remote servers (beta), allowing you to extend Claude’s capabilities with custom tools, resources, and prompts from your MCP servers.
However, it is important to note that remote MCP server support is currently in beta and available for users on Claude Pro, Max, Team, and Enterprise plans (as of June 2025). Most users will still need to use local STDIO connections.
To stay up to date with the latest developments around MCP, we recommend regularly checking the following key resources:
Documentation:

Update pages:


Now that we have discussed the latest updates in MCP, let's shift our focus to the primary objective of this chapter: integration of MCP into the most popular Agentic AI frameworks: LlamaIndex, CrewAI, Langgraph and PydanticAI.
Framework overview
Before diving into integration specifics, let’s briefly overview each framework and its role in the agentic AI ecosystem:
LangGraph

A framework for building stateful, graph-based AI workflows with multiple actors. LangGraph emphasizes a graph-of-nodes approach where each node can represent an LLM invocation or a tool call, allowing complex agent behaviors.
It is designed to orchestrate multi-step interactions and it also integrates with LangChain components wherever needed.
In essence, LangGraph provides the “wiring” for connecting LLMs to tools in a directed workflow graph.
LlamaIndex

An open-source framework, formerly known as GPT Index, originally built for connecting LLMs to external data via indexes, which has evolved to include an agent toolkit.
LlamaIndex enables LLMs to use tools and external knowledge through a structured interface. Recently, it added an MCP connector that allows LlamaIndex agents to call MCP-compliant capabilities.
This lets developers deploy LlamaIndex agents that can invoke any tool exposed by an MCP server.
CrewAI

A lightweight, high-performance and almost no-code agent framework to create “AI agent teams” (called crews) where each agent has a specialized role. CrewAI emphasizes autonomous collaboration among agents and fine-grained control over their workflows.
It provides constructs like Crew, Agent, Task, and Process to structure complex AI solutions. CrewAI’s design focuses on native support for the integration of external tools.
Through the crewai-tools library, CrewAI can treat MCP servers as tool providers.
PydanticAI

A Python agent framework aimed at production-grade AI applications. PydanticAI uses Pydantic’s data validation strengths to enforce type-safe interactions with LLMs and tools.
Importantly, PydanticAI has first-class support for MCP, this means, an agent can act as an MCP client and agents can be embedded as MCP server tools.
In practice, PydanticAI’s MCP integration is very comprehensive, covering multiple transport protocols and features like sampling. We’ll explore these capabilities in detail.
With these introductions in mind, let’s examine how each framework integrates with MCP. We’ll start with LangGraph, move through LlamaIndex and CrewAI, and conclude with Pydantic’s MCP support. Each section includes code snippets and explanations wherever necessary to illustrate the integration patterns.
LangGraph integration with MCP

LangGraph, by design, enables complex AI agent workflows using a graph of nodes that manage state and decisions. Integrating MCP into LangGraph allows these graph-based agents to utilize capabilities exposed by MCP servers.
In practical terms, a LangGraph agent can list and invoke MCP prompts, resources, and tools as part of its workflow.
This combination gives a structured, stateful control (via LangGraph) over a rich ecosystem of MCP-provided capabilities.
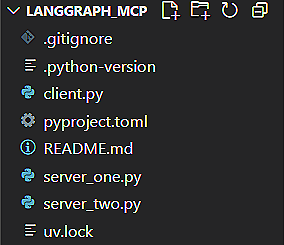
Project setup
The code and project setup we are using here are attached below as a zip file. You can simply extract it and run uv sync command to get going. It is recommended to follow the instructions in the README file to get started.
Download the zip file below: