Sandboxing in MCP
MCP Part 7: A deep dive into understanding sandboxing and its need in MCP.
Recap of Part 6
In part 6, we moved from functionality to safety, laying down the groundwork for testing and securing MCP systems.
We introduced the MCP Inspector, which acts as a live debugging interface for visualizing, replaying, and inspecting server behavior. It’s an essential tool for development, troubleshooting, and validating how your server behaves in real time.
We then dove into the security landscape of MCP, examining key risks and vulnerabilities:
- Prompt injection via tool poisoning.
- Server impersonation and tool name collisions.
- Rug pull-style trust violations.
- Overexposure of capabilities, especially via filesystem tools.
To mitigate these, we introduced MCP Roots, which let you define file access boundaries for your server and implemented them using FastMCP, alongside additional server initialization logic and client integration.
If you haven’t studied Part 6 yet, we strongly recommend going through it first. You can read it below:
With that security foundation in place, we’re now ready to tackle the final layer of protection: Sandboxing.
What's in this part?
In this second installment, we’ll focus on containerizing and sandboxing your MCP servers using Docker, ensuring that even if a server is compromised or receives unsafe input, the damage is confined.
We’ll cover:
- How to containerize a FastMCP server from scratch.
- Writing a secure Dockerfile, step by step.
- Running containers with hardened settings, like read-only volumes, no network access, memory caps, and dropped Linux capabilities.
- Integrating these sandboxed containers into your local tooling and IDEs:
- Claude Desktop
- Cursor IDE
- Custom FastMCP clients
- How to connect these sandboxed servers to MCP Inspector for real-time debugging inside a secure runtime.
By the end of this chapter, you’ll know how to:
- Contain potentially dangerous execution flows.
- Confidently share and run servers in untrusted environments.
- Apply fine-grained resource controls to your AI toolchains.
Let’s dive in.
Sandboxing MCP servers with Docker
Running an MCP server (and its tools) directly on your machine means any code those tools execute (even potentially untrusted third-party code) runs with access to your local environment.
This poses security and stability concerns: the server could modify files, consume excessive resources, or conflict with your system’s environment.
Docker-based sandboxing addresses these issues by encapsulating the entire server in an isolated container environment.
Key benefits of containerizing the server include:
- Security isolation: The server’s code and its tools run in a confined environment with limited access to the system. Docker containers have their own filesystem, process space, and networking by default, so even if an LLM-directed tool tries to do something dangerous, it’s constrained within the container.
- Dependency and environment consistency: You can bake all required libraries and dependencies into the container image. This avoids the “works on my machine” problem and ensures the MCP server has the exact runtime it needs. The server won’t conflict with other Python packages on your system because it uses its own environment.
- Reproducible deployment: A Docker image can be versioned and deployed anywhere (local machine, cloud VM, etc.) with identical behavior. This is particularly useful for MCP servers, which you might run locally during development and then later host remotely. With Docker, the transition is seamless.
- Resource limiting control: Docker allows restricting CPU, memory, network, and even device access. You could run your container with limited CPU/RAM to prevent abuse, or with a read-only filesystem if the server doesn’t need to write files. These measures further sandbox the server’s capabilities.
In summary, sandboxing an MCP server via Docker means the entire MCP server (and all its tools) runs in an isolated container. This approach is often simple, robust, and also aligns with best practices for development.
In fact, there's also a repository that has containerized versions of 450+ MCP servers in a single repo!
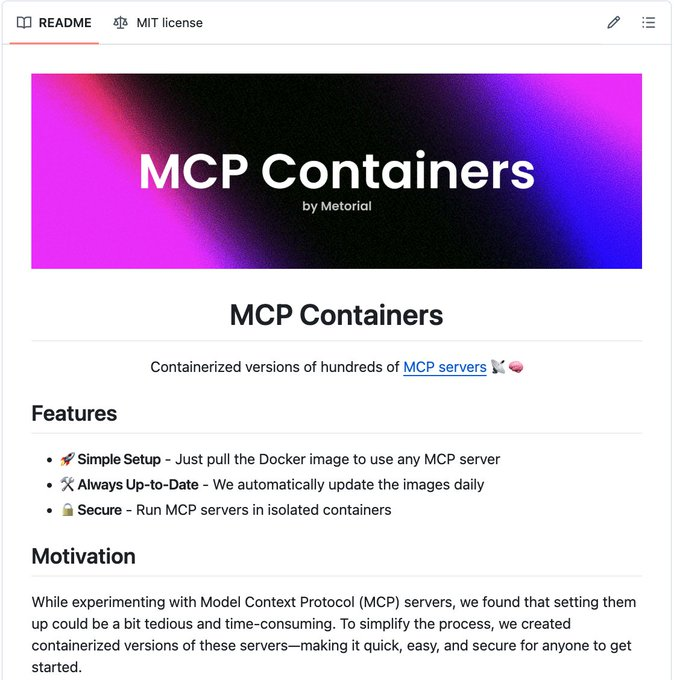
- No manual setup—just pull the image.
- Safe to run in isolated containers, unlike scripts.
- Auto-updated daily.
This makes it the easiest and safest way to use MCP servers with Agents.

Moving on, to download and set up Docker on your system based on your operating system, check out the official guide linked below:

Building a Docker-sandboxed server
Let’s walk through setting up a simple example server and then creating a Docker image for it.
Server code
For demonstration, we’ll use a minimal toy server with a single tool. In practice, your server could be more complex, but this example keeps it simple while covering integration, and you can easily extend it to complex use cases as needed.
On a side note:
You can download the primary codebase for sandboxing with Docker for an SSE server using the link below. Please refer to the open-me.ipynb notebook for detailed setup instructions.
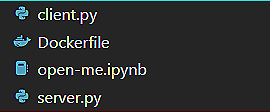
Download below: